Followers

Showing posts with label Halloween. Show all posts

Thursday, September 26, 2013

Fancy Fold Halloween Card

Hi everyone!  It's Halloween time over at the Card A Day Blog, and I have a cute fancy-fold card to show you.  My inspiration for this card came from Splitcoaststampers, but I have modified it slightly and changed the sizing.  I'll give you a look first, then go into the details.


I wanted my card to fit the standard A2 sized envelope, so I started with a card base cut at 5 1/2" x 8 1/2".  This card is actually a modified tri-shutter style, but with the different cuts and folds it features a centerpiece.  Here are the measurements:  make a cut 2 1/8" from each short side starting at 1" from the top and ending 1" from the bottom.  Turn the card and cut 1 1/16" starting at the previous cut and going in toward the center of the card.  Do this on all four corners. 
 
 
This photo of the back of my card should give you an idea of what you will have when you fold.  It works best to score your card (top and bottom) at the 2 1/8 and 3 3/16 points.  The 2 1/8 scores will make 'valley folds' and the 3 3/16 scores will make 'mountain folds.'This will give you the centerpiece of your card which should now measure 3 1/2" x 4 1/4".


In the sample I saw on SCS, the designer cut out two rectangles and then added a centerpiece.  I elected to simply cut around three sides and leave the center intact.

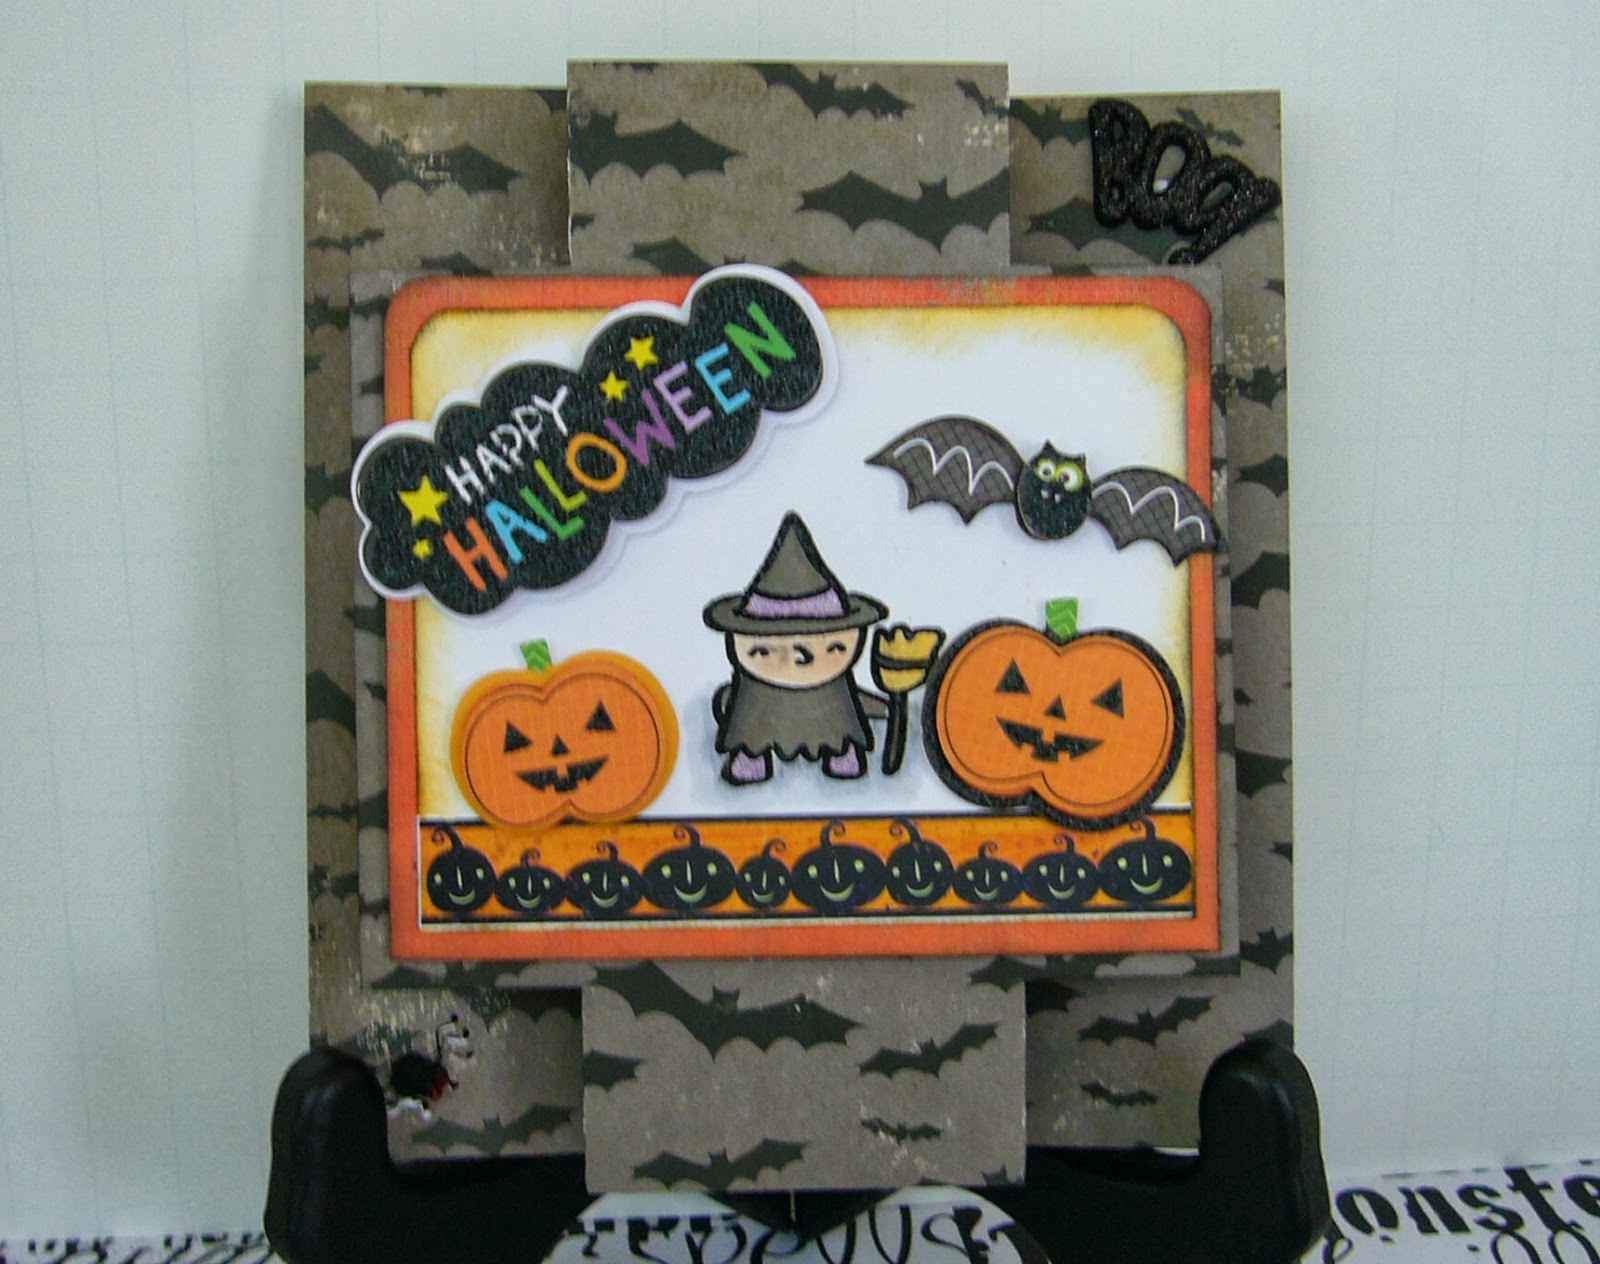
Next I built the centerpiece using an orange dp as a mat and a piece of white cardstock for my background.


I stamped and colored the little witch, the bottom border is a rub-on, and all the rest are stickers.  I used my 1/4" corner rounder for the top of the two layers and did some ink distressing around the edges.


You can see in the previous three photos that the stickers, themselves, are multi-layered.  Also, they are affixed with foam tape as is the full front piece.

This card can stand alone very nicely, as you will see in the next photo, or use an easel to feature it as I did in most of my photos.


I hope you've enjoyed my fun little card.  It was actually fairly quick to make; especially since I used ready made embellishments.  If you have questions, please leave them in the comments with a way to contact you.  I will answer as quickly as I can.

Here are some details for you:
     Paper:  Making Memories "Spook Alley" pack-card base
     Stamp:  Pink By Design "Guess Who" set
     Inks:  Ranger Distress "Spiced Marmalade" and "Black Soot" and Versamark
     Embossing Powder:  Stampendous "Detail Black"
     Embellishments:  Recollections Layered Accents and Rub-On, Jolee's boutique Spider, Recollections BOO!

Thanks for visiting!  'Til next time...

Big HUGS!
CHRISTINE

Sunday, September 30, 2012

CDAC Challenge Series

Happy Fall, everyone!!

I have two very different cards for you today.  We recently started a new Progressive Challenge series at the Crafter's Digital Arts Center, and I'm already behind in showing my cards to you.  If you're not familiar with these challenges, do be sure to click on the link and check out the site.  There are lots of fun activities for digital artists.  In the Progressive Challenge Group, we are currently on challenge 20, but I will show you the card for challenge 19 first.

Since summer was coming to an end, our challenge leader wanted to celebrate the summer season.  We had a fun surfboard digi image from Tiffany Doodles.  I hope you like what I've done with it; I turned mine into a 'feel better' card.


I decided to keep the card fairly simple and used coordinating design papers to paper-piece the surfboards, and I used a 'sandy' colored paper with a bit of inking to add a little dimension and shadow.  I made up the the outside sentiment, printed it and affixed it with foam tape putting a bit of curl into it for fun.
 
Here is the inside.  I thought I knew where the sentiment came from, but I couldn't find it (maybe Gina K. Designs)  to tell you for sure.  I thought it was a perfect match for the theme of my card.  Added Oct 2, 2012- FOUND IT:  Pink By Design 'live life creatively' set.


The current challenge, PC20, uses an image from Priscilla Styles.  It's a cute Halloween design featuring a frustrated-looking kitty wearing a bat mask.  I did the coloring with various markers.


Once again, I printed my own sentiment.  I added a spider to the original image, and used embossing on the spider and the mask. I know they look gold, but that's just the reflection of the light. Take a look at the next photo.  I was careful not to get the glare.


Here is a look at the inside:


I thought it would be fun to use a stamp of a scarey kitty before it got too pooped.  The card base is cut to A2 size from black card stock from Recollections.

Thanks for coming by to visit today.  See you again soon!

BIG HUGS,

CHRISTINE

Tuesday, September 25, 2012

A Dark and Creepy Night

Oh, yes, it's definitely getting to be that time of year.  I just wish the years didn't turn around so fast.  Thank you for stopping by today, and welcome if you're a new visitor from the Card A Day Blog.  As you may have guessed I am today's designer for the CADB where our theme for the week is Halloween.  It was really fun putting my card together, except that I was having a little difficulty getting the pieces all cut with my Cricut.  Otherwise, there would have been a nice 'creepy' sentiment on the front.  I'll just have to figure that out later.  In the meantime, how about some pictures?


I started with a 6x6" card base to fit all the elements that I planned to use.  The front is another 6x6" piece layered onto the base.  Most of the pieces were cut from the Cricut "A Frightful Affair" cartridge.  I needed the larger card base because the pieces needed to be cut a bit large to get in the details.


The ground is torn black paper layered on a shadow of purple.  The tree is layered on purple as well.  Can you guess what the moon is made from?  Stay tuned to the end if you want the answer.

The next picture is a close-up of the scene around the base of the tree.  We have some scary jack-o-lanterns, a very creepy hand coming up out of the ground, and a few rats scurrying about looking for something they can snack on.  All the pieces have been inked a bit with some silvery ink to show that they are picking up the glow of the bright moon.


I hope you're able to see the layering on this card.  The pieces were all affixed with different thicknesses of foam tape.Here, finally, is the full front view:


On a couple of the photos you can get a peek at the inside of the card, which is just the reverse side of the double-sided card base paper that I used.  It puts me in mind of a dense green woodsy scene with just a bit of light showing through.

Small details:
          Papers:  Coredinations purple, Glitz Design 'Hallow Flames', Papertrey 'Pure Poppy', Recollections black
          Inks:  Studio g VP0015 (a glittery silver chalk ink) and VP0017 (white)

I hope you have some fun making a few Halloween cards this year.  I think they are some of my favorite cards to design and make.

Oh, were you able to guess?  The moon is cut from the inner seal of a jar of peanut butter!  What kinds of things can you come up with to use in unexpected ways?

See you again soon and remember to always keep your creative genius happy and well-fed!!

CHRISTINE

Friday, October 14, 2011

A Beary Cute Halloween

I just love being part of the CRAFTERS DIGITAL ARTS CENTER where so many digital artists come together to share their designs and ideas.  My card today is for the CDAC Progressive Challenge #4.  The theme for this challenge is Halloween or Mystical, and the digi art I chose to use comes from Sew Many Cards Digital Stamps.  I couldn't resist such a cute design.  Here it is after coloring:

I used Copics and Bic Mark-Its for the coloring---lots of them as you can see here:


The card base is white Wausau Vellum in standard A2 size.  I used black Recollections card stock for the mat, and ran it through my Cuttlebug in a Sizzix for Stampin' Up Spider Web Textured Impressions folder.  I gave the spider web a hint of color and glitter with studio g silver chalk ink.

I used the out-of-the-box technique (you'll find lots of tutorials if you do a quick search) to cut and frame the image, and used foam tape to mount it on a piece of Papertrey Ink Bitty Dot Basics paper with the corners cut using a Tonic corner punch.  The image and the card base were lightly inked with Martha Stewart by EK Success Curry ink.

For the finishing touches I used a dimensional sticker for the greeting (K&Company) and added a funny little spider (EK Success Jolee's Boutique).


On the inside I added another dimensional sticker mounted on the same dotted paper:


Well, I hope you enjoyed this cute little Halloween creation.  I loved working with adorable little Bailey Bear and his jack o'lantern candy bowl.


Have a wonderful day, and always keep your creative genius flowing!!

CHRISTINE

Saturday, October 8, 2011

Hauntingly Spooktacular

I have another fun, I think, Halloween card for you.  In fact, each time I look at it I like it even more.  This card was made with ALL scraps, even the card base, as I made it for a scrap challenge at Paperthreads.  The challenge is to make a holiday-themed card using only scraps.  I had such fun making this one.


Here's the inside:

And close-ups:


All the circle stamps came from Just Rite 'Witch Way to the Treats' set, and the graveyard stamp is from an Inkadinkado mini borders set.  Everything was stamped with Ancient Page Coal Black and colored with Tombow and Stampin'UP markers.  I also used Spellbinders Circles and Petite Scallop Circles, a 1" EK Success circle punch, and the Crop-a-Dile Corner Chomper.  The embossed 'frame' around the card was done on my Score-Buddy.  Other inking was done with Stampin'UP inks, and a tiny bit of glitter was added to the spider web using my Sakura clear star pen.

Please don't ask what paper I used; after all, it's all scraps, and I just don't remember.  :)

This challenge runs until October 12.  Thanks Paperthreads!
I'd also like to enter this card in the Making Halloween Cards Challenge

Thanks for stopping by today, my friends!!

Always keep your creative genius flowing.........

CHRISTINE

Tuesday, September 27, 2011

Best Witches.....

It's 'Halloween' week at the Card A Day Blog, and I decided I wanted to try cute rather than scary.  If you're new here from CADB, welcome.  I'm glad to have you here for a visit, and hope you'll decide to become a follower.

As I was foraging through my Halloween goodies to come up with an idea for my card, I happened upon some Sizzix dies that I had forgotten about.  I had been considering a newish stamp set that I had, and thought the combination would make for a fun card.  It all started with a certain cute little Halloween witch.................


I stamped her on white cardstock, colored her with markers and paper-pieced her dress.  I die-cut the ghost, and then backed his head with a shimmery scrap to highlight the eyes and mouth.  Then I inked him with some blue and gray for dimension.  I die-cut the word 'Beware' from a piece of gray and black patterned paper, but instead of using the letters, I used the negative and backed it with some orange that I had darkened a bit with gray ink.

Next I went to work on the jack-o-lanterns.  I had two different dies, so I cut them both twice, and reversed the colors for the eyes and mouths.  I colored the stems, and inked around the eyes, mouths and outer edges.

The card base is a two-sided patterned paper.  I liked the green for the outside of the card, but it was a bit bright.  I used gray ink on a cloud background stamp to darken the green a little.  You really can't see the clouds, but it provides the needed effect.  I used a torn paper mask so as not to stamp the lower part of the card.  Then I added a dark bottom border using more of the gray/black striped paper.

Most of the elements were mounted with dimensionals.  You can see all the layering in the next photo.


The reverse side of the card stock is sort of a wild flame pattern.  It's in the wrong orientation for fire, and I thought I would insert a liner.  Flipping the card open, I decided it would be a fun surprise to leave it as it was, and just added a sentiment and a spot for a signature which carried over the colors from the outside.


Here's a closer shot of the sentiment!

I had so much fun putting this card together.  Hope you like it!!


Here's the recipe:
     Stamps:  Unity Bella Blvd 'Best Witches'; Impression-Obsession 'Clouds'
     Dies:  Sizzix Brenda Pinnick Pumpkin Face, Ghost, Jack-O-Lantern #2
     Inks:  Stampin' Up Basic Gray and Bashful Blue; Versafine Onyx Black
     Markers:  Copic; Tombow
     Cardstock:  Glitz Design Hallow Flames; Generations Stackers; Recollections; Stampin' Up
     Scissors:  Fiskars Paper Edgers

I hope you have a sec to leave a comment........I'm really glad you stopped by today!


And remember:  keep your creative genius flowing.........

CHRISTINE

Sunday, September 18, 2011

Cats and Bats and Spiders, OH MY! ! !

I think Halloween really might be my favorite holiday for making cards.  It's just so much fun to pull out all the spooky and creepy and scary elements that we can use for this wild and crazy holiday.  Today's card is another design for the Card A Day Blog theme week, 'Cats and Bats.'  This post is somewhat photo packed so you can get up close and personal with all the details and angles.

The base for today's card is a leftover piece of a 12x12 Halloween-themed heavier-weight design paper I used last year.  You can see the card, which used the reverse side of the paper, here .  Unfortunately, I neglected to note down the source of the paper.  As in that card, I decided to make this one a tri-fold shutter, it gives so many surfaces and hiding places for design elements.  The 6x12 base is scored at 2", 4", 8" and 10" and cuts are made the length of the piece at 1 5/8" from each edge and between the 2" and 10" score lines.  The spacing of the cuts can be changed as desired.  Here is a photo of the back of the card which will give you a good idea of what your piece should look like when scored, cut and folded.  The card finishes at 4"x6".

With the base prepared, I started planning all the elements.  Of course, I knew the theme I was following, so that gave me my start.  I decided to feature the 'stars' of the theme, the bats and cat, on the front.  They needed a 'setting' so I added the gravestone.  You're going to love this:  the gravestone was cut from an old envelope.  I thought the inside of the envelope was great for a look of granite.


I love the look of the 'blood-drip' letters in the warning sign.  And, of course there must be a spider creeping along in the fallen branches.


The spider needs a sparkly web.  And it just wouldn't be right to leave out the jack-o-lantern or the skull and crossbones.  I also added a little extra sparkle here and there which doesn't show up well in the photos.
 

I hope you've enjoyed my bit of Halloween fun with cats and bats.  Here's the main recipe, followed by a few last photos.

RECIPE:
  Dies:  CRICUT October 31 Cartridge; Cuttlebug 'Creepy', 'Beware', 'RIP'
  Papers:  Recollections
  Stickers:  Jolee's boutique, K&Company Layered Accents 'Spooktacular'
  Rub-Ons:  K&Company
  Rhinestones:  Studio 18
  Ink:  Stampin' Up Basic Gray
  Glitter Pens:  Copic Spica Black, Gelly Roll Clear Star
  Dimensional:  3L Black 3D Foam Squares


  I hope you have a moment to leave some love.  See you again soon!!


Be sure to keep your creative genius flowing.........

CHRISTINE

Tuesday, September 6, 2011

Havin' a Hootin' Good Time............

   A big welcome to those of you joining me from the new Card A Day Blog .  I do hope you'll consider becoming a follower.  If you're already a follower, and are not yet familiar with this fun, new inspirational blog, please stop on by.  We have several wonderful designers, weekly themes, and challenges with prizes!!

  I am having so much fun using OWLS on my cards this week.  Every day, it seems, I'm thinking of different ways to use this versatile image, especially when I hear the owls hooting in the woods behind our house at night.

  The card I have for you today has a slightly more atmospheric mood.  I'm using it for Halloween, but it can easily be adapted with a different style of owl and different backgrounds and elements for most any kind of event.

  I guess I've been in a 'krafty' mood this week -- paper, that is -- because that's how this card started.  But the way I feel about it.....


  My card base is the standard A2 (5 1/2" x 4 1/4") size.  I stamped the background forest in Stampin' Up Basic Gray ink using a wonderful 6"x6" stamp, 'Branches,' from Impression Obsession's Cover-a-Card line.  If you're not familiar with these stamps, do check them out.  They have some really fabulous backgrounds (disclaimer here:  no affiliation).  I wanted a shadowy look, but not too dark.  My big golden Autumn moon is cut from a lovely shimmery paper from Paper Temptress using a large Spellbinder's circle die.

  I needed something for my owl to sit upon, but I wanted a change from the branch, so I put him on Martha Stewart's Spooky Fence punched from Recollections black card stock.  The owl, itself, is from the Stampin' Up set, Dark and Dreary, and was stamped on white cardstock with Versamark ink and heat embossed with Zing black embossing powder.  The sentiment comes from a Studio G mini set, and is stamped on the same gold shimmer paper used for the moon and also embossed with the black powder.  It's matted on a bit of the punched fence for a little added detail.  Both the owl and the sentiment are mounted with dimensionals.

  The three little birds in the tree are actually part of the fence punchout.  I felt I needed a bit of something on that part of the card, so I cut them off the fence, coated them with Glossy Accents and put them in the tree.  For a finishing touch, I used glitter pens to add a spooky glow to the owl's eyes and some moonlight glimmer to the spider webs, the fence and the ground between the fenceposts.  If you click on the photo, I think you'll get a better look at the detail and texture on the card.

Here is a photo showing you the supplies I used:


  Just for a fun surprise, the inside of my card is stamped with the same background as the front.  It reads, "So Have a Happy Whoooootin' Halloween."

  I hope you've enjoyed your visit with me today.  Feel free to leave some love, and tell me what you like (or don't) about today's card.


Do remember to always keep your creative juices flowing.........


CHRISTINE