Followers

Showing posts with label Cricut. Show all posts

Monday, September 16, 2013

3.....2.....1.....BLAST OFF!

Greetings, Earthlings.  Please do not attack -- we come in peace.  Repeat -- we come in PEACE.
YES, it's fun to be silly sometimes, and the silly bug got me for this weeks' Card A Day Blog theme.  It's a full week of 'Kiddie Cards.'  I must warn you that making cards for the kids is not exactly my usual cup of tea, but I did have some fun with this one.

I broke out the old Cricut, some aluminum foil, a few scraps and a new embossing folder that I couldn't wait to use.  It was only after I had all my card elements ready that I decided my card base would be black and cut to 5 1/2" x 4 1/4" to fit the standard A2 envelope.

As I am certain you have guessed, my card has an outer space theme.  I started out by cutting a piece of heavy duty foil and embossing it with my new folder using my Cuttlebug.  Then I used the Cricut Craft Room to prepare my designs for cutting.  Here is your first photo:


I wanted the background to have the look of the interior of a space ship -- no I've never been in a space ship, but I used to watch Star Trek.  Anyway, just let your imagination take over for awhile.  I cut all the pieces at 2 1/2" except the rocket, which I cut at 3 1/2".  I used Copics to do the small bits of coloring that were needed.


I layered the pieces that needed to be layered, then used some glitter pens to add a little sparkle.  If you look closely, you'll see that the astronaut's helmet shows that he's from the USA.  I didn't want to get too fancy so I just wrote the letters by hand with one of the glitter pens.


 The rocket was affixed flat to the background.  The other elements were added using foam tape. 


I haven't added a sentiment, yet, because I think this card could be used for a number of occasions.  However, I did add a layer for writing or stamping to the inside, as well as a few foil stars to bring a bit of the outside in.


If you haven't made any cards for the younger set, go ahead and create a few.  Even if you have no one to send them to personally, there are plenty of organizations who would love to have cards on hand to give to kids who could use a lift.


I hope you've enjoyed my little 'spacey' card today.  Here are a few details:

     Paper:  Recollections and heavy duty aluminum foil
     Dies:  Shapez (for Xyron) "Star" by Spellbinders
     Cartridge:  Cricut "Everyday Paper Dolls"
     Embossing Folder:  Stampin' Up "Honeycomb"

If you're here from the Card A Day Blog then you know about our monthly challenges and prizes, and I thank you for visiting.  If you've never been there, I'd like to invite you over to check us out.  We have several themes each month with the chance to win a nice challenge prize if you enter.

'Til next time.....

Big HUGS!
CHRISTINE

Sunday, June 9, 2013

Stars and Stripes

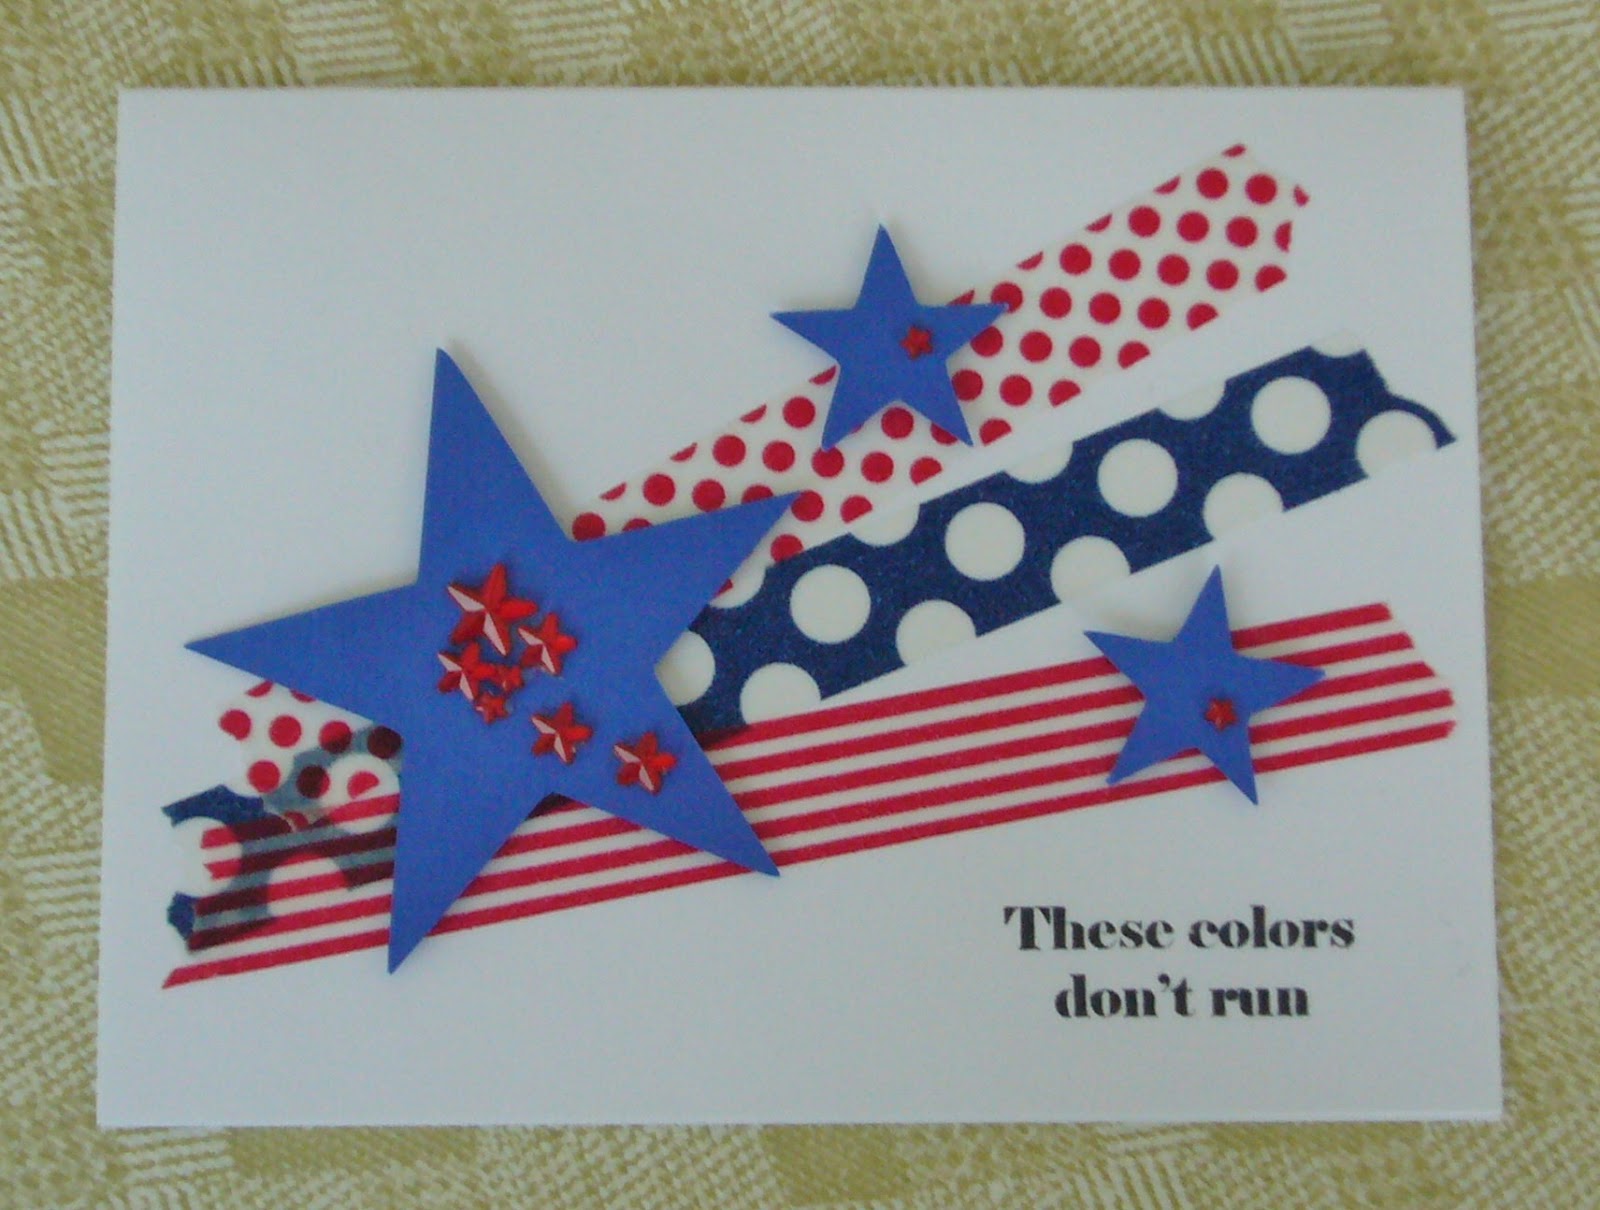
Yes, it is crazy, isn't it?  Two days in a row!  Just don't get used to it; I'm really not that prolific.  But I do have a card for you to bring in the new theme at the Card A Day Blog.  With Independence Day in the USA right around the corner, we are beginning our inspiration for 'Country's Birthday.'  My card does, indeed, celebrate the birth of the United States, and was a snap to put together.  A scrap of blue, a few strips of Washi Tape and a stamp with some ink, all added to a base, that's it.  Simple, Fun, Striking and Patriotic!


Oops, I forgot to mention the bling, which looks a little dull in the pics (sorry), but really does look nice in person.  The card started with a bright white A2 sized base.  The flared stripes are just three torn pieces of washi, and the stars were cut on my Cricut from a scrap of blue card.


I think you can see in this photo that the blue stars were affixed with foam tape.  Doing that and using the red blingy stars (Mark Richards Crystal Stickers) give a little dimension to the card.  The sentiment, from Pink By Design, was stamped with Versamark Black Onyx ink.


Didn't I tell you it was a quick one!?!  And just because it was so quick, I have another really fast card to show you.  This one harkens back to a card I made just about a year ago which you can see here.  I had saved the cut-out pieces to use them 'some day.'  Well, this was the day.  The leftover cuts simply needed a base, a couple of stars and a sentiment.  Here are the pics:


These two cards are great for Flag Day (June 14), Independence Day July 4) and Operation Write Home.   I hope I've given you a little inspiration for your country's birthday, whenever it is.

That's it for me today.  See you again very soon, I hope!!

Big HUGS!
CHRISTINE

Friday, March 15, 2013

For the Girl Scouts

Hi everyone!  I thought I'd show you one of the projects I helped with for our local Girl Scout troop.  They're doing some fundraising at a craft fair for a trip to Europe they're planning, and one of their ideas was fairy wands.  I cut various shapes in fun foam on my Cricut and sprayed on some glitter; the girls painted dowels, added ribbons and embellishments and did the assembly.

 
The girls also were asking for some items that would appeal to other scouts.  You can see some trefoil shapes among the others here:


I'm entering these in the Anything Goes Challenge at CDAC.  If you like challenges, and you haven't been there for a visit, I would suggest you click on over.  There's lots of fun to be had, and often prizes!  Come join the fun!!

Thanks for visiting today,
CHRISTINE

Thursday, February 7, 2013

Howdee Y'all

Down over yonder, at the Card A Day Blog , our subject for inspiration this week is 'Invitation.'  So I am hereby inviting you to view my contribution.  It may be a little early, at least in my neck of the woods, to be thinking of summertime activities, but my hubby fixed some ribs recently, and that got me thinking about barbeque, and that led me to thinkin' 'bout Texas and cowboy boots and a good ol' summer bar-b-que!  So, that is how my card began.

I started by searching for a boot in my collection of Cricut cartridges, as I wanted to create a shaped card.  I found just what I needed on the 'Just Because Cards' cart.  Using the "Cricut Craft Room" I added one boot to the mat, sized it to 4.25 x 5.5 to fit a standard A2 envelope, copied it and flipped the copy, and welded the two pieces to make my card base.  I then added a third boot, and sized it just a bit bigger so I could cut it from a design paper for the card front.


The dp is from the DCWV 'Textures and Finishes' stack.  I just love those papers!  The gold piece was cut from the liner that I had saved awhile ago from a box of chocolates.  Kinda crazy, I know.  I didn't have the right kind of stamp for my card, so I searched google for 'free western font' and downloaded exactly the kind of font I'd had in mind.  Then I was able to print my own front sentiment as well as the insert, which you can see in the next two pics.

 
Sorry for the fuzziness.  The close-up is much better.


I'll see all y'all again soon.  Thanks for the visit!!


BIG HUGS,
CHRISTINE

Tuesday, September 25, 2012

A Dark and Creepy Night

Oh, yes, it's definitely getting to be that time of year.  I just wish the years didn't turn around so fast.  Thank you for stopping by today, and welcome if you're a new visitor from the Card A Day Blog.  As you may have guessed I am today's designer for the CADB where our theme for the week is Halloween.  It was really fun putting my card together, except that I was having a little difficulty getting the pieces all cut with my Cricut.  Otherwise, there would have been a nice 'creepy' sentiment on the front.  I'll just have to figure that out later.  In the meantime, how about some pictures?


I started with a 6x6" card base to fit all the elements that I planned to use.  The front is another 6x6" piece layered onto the base.  Most of the pieces were cut from the Cricut "A Frightful Affair" cartridge.  I needed the larger card base because the pieces needed to be cut a bit large to get in the details.


The ground is torn black paper layered on a shadow of purple.  The tree is layered on purple as well.  Can you guess what the moon is made from?  Stay tuned to the end if you want the answer.

The next picture is a close-up of the scene around the base of the tree.  We have some scary jack-o-lanterns, a very creepy hand coming up out of the ground, and a few rats scurrying about looking for something they can snack on.  All the pieces have been inked a bit with some silvery ink to show that they are picking up the glow of the bright moon.


I hope you're able to see the layering on this card.  The pieces were all affixed with different thicknesses of foam tape.Here, finally, is the full front view:


On a couple of the photos you can get a peek at the inside of the card, which is just the reverse side of the double-sided card base paper that I used.  It puts me in mind of a dense green woodsy scene with just a bit of light showing through.

Small details:
          Papers:  Coredinations purple, Glitz Design 'Hallow Flames', Papertrey 'Pure Poppy', Recollections black
          Inks:  Studio g VP0015 (a glittery silver chalk ink) and VP0017 (white)

I hope you have some fun making a few Halloween cards this year.  I think they are some of my favorite cards to design and make.

Oh, were you able to guess?  The moon is cut from the inner seal of a jar of peanut butter!  What kinds of things can you come up with to use in unexpected ways?

See you again soon and remember to always keep your creative genius happy and well-fed!!

CHRISTINE

Sunday, August 26, 2012

A Little Faith

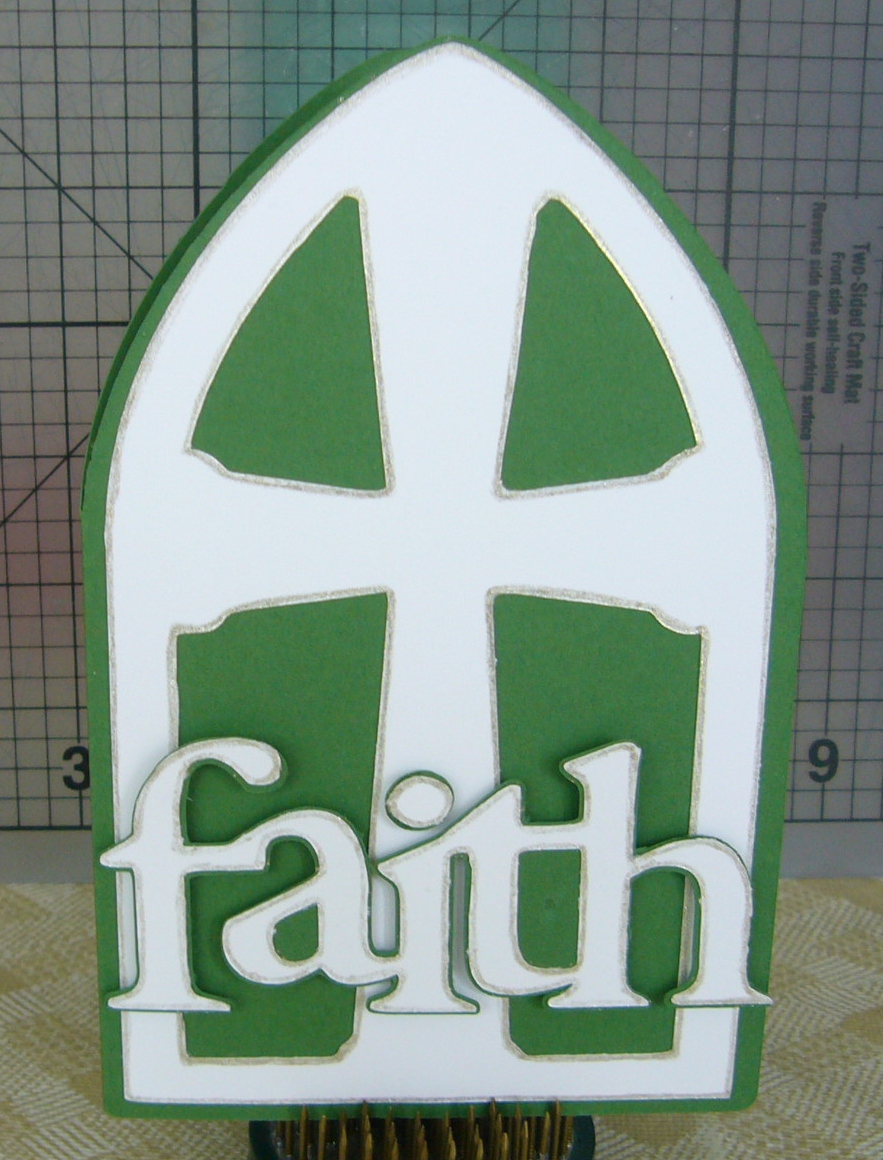
Happy Sunday, everyone!!  I do hope you're having a beautiful day, and I thank you for spending a bit of it with me.  I have another CADB design for you, and I'm so happy to have Sunday for this week's theme, which just happens to be 'With Faith.'  While there are many kinds of faith, I decided to work within a religious meaning.  I've been wanting to make more use of my Cricut and the many cartridges that I have, and I knew I had a cartridge with appropriate images for a 'faith' card.  So I went to my cart stash and pulled it out.

The card I made is really clean and simple.  Using the Cricut Craft Room software made designing my card really easy.  (Disclaimer:  no affiliation, not receiving payment or product for comments)  Once I had the design ready, the rest was simply a matter of choosing paper, cutting and assembling.


I chose the main image that I wanted, then created the card cutout using the shadow of the main image.  I chose the word 'faith' with its shadow and mounted it using foam tape.  I cut a matching white layer for the inside of the card so I could stamp a sentiment and have a nice space for a signature and personal message, if desired.


For just a tiny bit of glimmer (which is extremely hard to see in the photos) I used a glitter pen to outline all the white shapes.
 
 
This card fits into a 4" x 6" envelope.  Yes, I know, not my usual A2.  Crazy isn't it?  I jumped WAY out of my comfort zone on this one!!     heehee


Here are the very brief details:
          Cricut Cartdridge:  Inspired Heart (Cut on Cricut Expression 2)
          Papers:  Stampin' Up 'Whisper White' and 'Garden Green'
          Stamp:  Stampin' Up 'Thoughts and Prayers' set
          Ink:  Ancient Page 'Pine' dye inkpad
          Glitter Pen:  Sakura Gelly Roll 'Clear Star'
 
See you again soon.  In the meantime remember to always keep your creative genius happy and well fed!!!
 
CHRISTINE


Thursday, August 2, 2012

A Real Cut-Up

Hi everyone!  Wow, I can't believe we're already into the month of August.  This year is going by so very fast that I can hardly keep up............. 

My card today is for the Card A Day Blog theme of Using Die Cuts.  I had a certain design in mind, but then I remembered I hadn't made a card, yet, for a special little girl in my family whose birthday party is in two days.  So, I decided to combine the two projects and save a little time.  Since we were using die cuts, I thought I'd delve into my Cricut carts and see what I could come up with.  I started exploring one of the carts that was included in the purchase of the Expression 2 when it was released for the Cricut Anniversary.  I was hoping to make a card using nothing BUT die cuts, and I nearly succeeded.  The cartridge I used is called 'Just a Note' and includes a card feature.  I was able to find the perfect card for our little birthday girl.


This tri-fold card turned out to be just what I needed.  We will be celebrating a first birthday, and the cake, appropriately, has one candle.  I really didn't have to do much besides setting the sizes for the cuts and choosing the papers.  I knew I would be using pink, so I had no problem making choices for the layers with coordinating papers from my stash.  I also happened to have some coordinating stickers which I was able to use for a little embellishment along with some tiny punched hearts and a little bling to accent the letters on the front.

Here are two more pics to show the different parts of the card more clearly:


The picture just above is the inside of the card.  I wanted to hide 'lst' or '#1' under the cake, and I happened to have a number one sticker that I paired with the little flower standing in for the # sign.

Here is your final pic which shows the card before the two sides are opened:


I hope you've enjoyed your visit today.  Don't be shy about leaving a comment; I love to read them.  And I'll be sure to answer any questions promptly.

The nitty-gritty:
          Papers:  Recollections and K&Company
          Stickers:  K&Company Brenda Walton 'Small Wonders Girl'
          Punch:  Stampin' Up Owl (Yes, the tiny hearts)
          Gems:  Darice


REMEMBER,  always keep your creative genius happy and well-fed!

CHRISTINE


Thursday, June 14, 2012

FLAG DAY SALUTE!

Hi everyone!  Sorry I've been away for awhile -- bit of an injury kept me from doing much with my hands.  But I'm much better, now, and happy to be bringing you this card which celebrates Flag Day and honors our military heroes. 

I am designer today for the Card A Day Blog where our theme of the week is "Red, White and Blue."  It was a happy coincidence that I had signed up for this date (or maybe it was my subconscience telling me to do it).  Either way, I hope you enjoy this simple patriotic card.

I started with an A2-sized card base in kraft.  I chose that color to symbolize earth; not the Earth, just earth.  I used a nice blue mat which I embossed in my Cuttlebug using a stars folder.  I wanted to incorporate the U.S. flag in my card, and I chose a Cricut cartridge with various flag designs.  I love the flag motif in the shape of the U.S.


I hope you can see the embossed stars on the blue background (click on the picture to enlarge it).  I had a closer pic, but it was not quite in focus.  The sentiment is from the Pink by Design set called "Our Troops."  It's a must-have set for any cardmaker with someone in the military or for OWH.

My inside sentiment is from the same set.  I wanted just a bit of the color brought to the inside, so I used a white mat, stamped the sentiment in red, and added a blue paper strip to break up the white.


Thanks for visiting today.  Display your flags proudly!!

Here are the supplies used:
          Cricut Cartridge:  Stand and Salute
          Ink:  Stampin'Up Classic 'Real Red'
          Stamps:  Pink By Design 'Our Troops'
          Embossing Folder:  Cuttlebug 'Stars'
          Brads:  American Crafts 'Elements' Mini Glitter Brads Primaries
          Glues:  Tombo Mono Adhesive, Zig 2-Way

Remember, always keep your creative genius happy and well-fed!

CHRISTINE

Tuesday, April 17, 2012

2012 GRAD

Hi everyone!!  As today's designer at the Card A Day Blog I have another fun, and fairly quick, graduation card to show you.  I used my Cricut and the Cricut Craft Room online design software to make this one, but you can certainly make something very similar using scissors, paper punches or stickers. 

The card base was cut at 9" X 7 1/2" with the finished card fitting into a #10 business envelope (9 1/2" x 4").  The white liner was cut at 9" X 7 1/4" and inserted to leave a bottom border.  The letters of the two words were welded, and then cut at 1 5/8" (real dial size off).


As you can see in the photo, the graduate's colors are purple and gold.  I chose a vibrant purple for the letters, a softer lilac for the base card and a pretty gold ribbon behind the letters. The ribbon was wrapped to the inside before attaching the liner so the ends are covered nicely. This card is for a young man, so I wanted to give it a masculine look.....no bows, no flowers.....you know the drill.  I decided to use white numbers (with just a bit of glitter) to coordinate with the white liner.  The words were applied with foam tape to give dimension.

Here's the full front view:


I'm really happy with the way this card turned out.  I hope you like it, too.  Here is the short list of supplies:

          Paper:  words-Core'dinations, card base-Basis by Leader Paper Products, liner-Wassau
          Ribbon:  The Ribbon Boutique (JoAnn's, I think)
          Cricut Cartridges:  words-Blackletter, card and liner-George and Basic Shapes plus Elegant Edges
          Numbers:  Thickers 'Delight' from American Crafts
          Adhesive:  Tombow Mono, generic foam tape

And that's it!!

Over at CADB we have challenges running all month long based on our themes for that month.  Please join us; we always give prizes!!!

See you again soon, and remember, always keep your creative genius happy and well-fed.

CHRISTINE

Monday, January 2, 2012

Ring in the New Year with LOVE

Hello everyone, and HAPPY NEW YEAR!!!  I hope all of you enjoyed a season of abundant joy and many blessings.  I know I did.  And now I'm ready to get back to the fun of creating.

I am so honored to have the first card of 2012 posted in the Card A Day Blog .  Our first theme of the year is Valentine's Day.  I had a few goals in mind when I started designing my card:  I wanted to use my Cricut; I wanted to create a shaped card; and I wanted my card to be sized for a #10 envelope instead of my so very typical standard A2 size (5 1/2 x 4 1/4).  With those goals in mind, and considering the subject, I determined that I would use the heart shape, but in multiples.  What I came up with is three stacked and layered hearts.  I'll show them to you one at a time from the top.


You can see in the photo that I started with a white, and inked, card base.  The layered heart was cut in red card, embossed on my Cuttlebug, and inked with white and red to show the texture.  The sentiment was cut from gold card, stamped and heat embossed with opaque white, inked just a bit and embellished with red jewels.  It was affixed with foam tape.


The middle heart was cut from a lovely silver glitter paper.  I decided to let the paper speak for itself, so it has no further embellishment other than a bit of red inking around the edges.  The glittery heart is affixed with foam tape to raise it just a bit from the top and bottom hearts.


My bottom heart was cut from the same pretty gold card stock as the top sentiment piece.  It's embellished with a stamped and heat embossed floral image enhanced with red jewels, as well as a smaller embossed heart cut from the same red card as the uppermost heart.  This small heart is also affixed with foam tape for extra dimension.  The white embossing of the floral image, as well as the sentiment, looked a little stark, so I softened it a bit with the red ink.

Because the card front has so many elements, I decided to leave the inside very plain except for a pretty sentiment which I stamped in red.


This stacked heart card base was created using a heart image from the Accent Essentials Cricut Cartridge on my Gypsy.  I took the simple heart image, duplicated it, stacked and then welded the three shapes.  I placed the folded card stock on the cutting mat so that the left side would not be cut.  I used a blade depth of 5 and repeated the cut twice to be sure both layers would be cut through.  For the layered hearts, I used the same heart image, but made it just a bit smaller than the size used for the base, and cut it from the three separate papers.  Here is the full front view, as well as an angled view to better show the dimension:


I do hope you've enjoyed your visit with me today.  I wish you many wonderfully creative times during the coming year, and hope that you and your family enjoy good health, happiness and lots of love.

Always keep your creative genius happy and well-fed!

CHRISTINE

Saturday, December 3, 2011

For Unto Us.....

Yes, a Child is born!  My post today is once again a card made for the Card A Day Blog.  Our inspiration theme this week is 'Christmas and Children' and I have chosen to make a card representing the very special Child whose birth we celebrate with the holiday season.  Since I was thinking about children, I wanted my creation to be a bit more lighthearted - not one of the rather formal cards I usually tend to make.  It all started with a little lamb; think Lamb of God, think animals at the stable, think cute for children.  Add Baby Jesus in the manger with a golden star shining overhead, and there you have it.


The sweet little lamb is cut from Cricut cartdridge 'Create A Critter.'  I wanted her to look festive so I added Christmas Red Stickles to her bows.


The manger scene, the sentiment and the 'Star in the East' were stamped from Unity Stamp itty bitty set 'A Child Is Born,' and heat embossed.  I hand cut the manger and used Spellbinders dies for the sentiment.  I added the patterned paper strip to ground the images - didn't want them to look like they were just floating.


For the inside of the card, I stamped the sentiment directly on the card, added another embossed star, and, to bring the outside colors to the inside, I used a strip of the same patterned paper, but in the opposite orientation.


And for the final reveal, here's the straight-on pic of the card front.


Hope you like my cute little card.  It's quite easy to make and fairly quick to reproduce.

The Details:
          Die Cuts:  Cricut cartridge 'Create A Critter,' Spellbinders Circles and Scallop Circles
          Paper:  A2 card base Waussau white card stock, K&Company 'Yultide,' Stampin' Up Very Vanilla
          Stamps:  Stampin' Up 'Beautiful Season,' Unity 'A Child Is Born'
          Inks:  Versamark, Versafine Onyx Black, Tim Holtz by Ranger 'Antique Linen' Distress Ink and Stampin' Up Lucky Limeade (both used for shading and edging)
          Embossing Powder:  Stampendous Detail Black and Detail Gold

Thanks for visiting today!  See you again soon!!!

Always keep your creative genius happy and well-fed!

CHRISTINE


Thursday, November 10, 2011

Hope, Joy and Love

Food, glorious food!!  It's such an important part of our holiday celebrations.  This week at Card A Day Blog our theme has been Christmas and Food.  I had visions of sugar plums dancing in my head, but I didn't have everything I needed to make them dance on my card.  Sooooo, I decided on candy canes instead.  Such an iconic image of the Christmas season, don't you think?


Of course, I couldn't just lay a couple of candy cane images on a card base, and call it a day.  I wanted to come up with an idea that would be a little more fun and inspiring for you.  I was reading something recently that referred to 'split negatives' using stamping.  I hadn't seen that in awhile, and thought it sounded promising for my card.  For anyone not familiar with that technique; an image is stamped twice, once on dark paper and once on light.  The image on dark paper is then heat embossed in white, while the image on light or white paper is heat embossed in black.  Both images are cut exactly in half, and then half of one is matched with the opposing half of the other.  It's a great effect!  And you can certainly use other sharply contrasting colors if you don't want the stark black and white.


Okay, well, I didn't have a candy cane stamp that I could use that way, but I do have a Cricut machine.  So I did a little search on my Gypsy, and here is what I came up with:

I first cut the main candy cane images and their shadows in the two traditional colors, red and white, and played around with different ways of layering them on various papers (read; scraps  lol).  During the process I came upon a white scrap that I had run through my crimper.  I really liked the texture, so I decided to leave out the shadow cuts, use the crimped piece as one background, and create a second textured background using an embossing folder and my Cuttlebug.  Once I was happy with that I was able to choose the mat and base card papers. 

As I was looking at the basic design and trying to decide on my sentiments, I determined that my candy canes were looking a little flat, so I added some glittered embossing powder.  It was just the effect I was looking for.

In getting ready to assemble my card, my first impulse was to set the candy canes back-to-back, as you see them in the above photo, which looked just fine.  But then the idea of turning them into a heart just jumped out at me.  Christmas is the season of love, after all!  Then, using the heart also gave me the idea for my sentiments which I created myself and printed.


I dressed up the inside of the card a bit with some of the same design paper as the front mat , and used the image shadows to bring the candy cane heart idea to the inside as well.


For the final touches, I applied the sentiments and candy canes to the front with foam tape for just a little more dimension, and added dashed lines on the mat and card base.  I think the white 'stitching' created a nice framed effect.  So, here is the finished card!


I hope I've given you some good ideas today.  Let me know if you have any questions, and I always appreciate your comments!

     Supply Deets:
          Papers:  Papertrey Ink Pure Poppy, Ripe Avocado card base (A2 size - 5 1/2 x 4 1/4) and Rustic Snowflakes design paper stack for mat; Wassau white
          Cricut Cartridge:  Very Merry Tags
          Embossing Folder:  Sizzix Peppermint Twists
          Embossing Powder:  Stampendous Red Tinsel, JudiKins Opaque White
          Glitter Glue:  Stickles Frosted Lace
          Other:  Versamark Watermark Stamp Pad, Cuttlebug, Inkssentials White Opaque Pen and Matte Accents, Fiskars Paper Crimper, tape runner


See you again soon, and always keep your creative genius flowing.........

CHRISTINE