Followers

Showing posts with label Ranger Distress. Show all posts

Thursday, April 3, 2014

In Sympathy

Welcome, friends.  We have a week of those sometimes difficult-to-make Sympathy cards as our inspiration for you at the Card A Day Blog.  I have been enjoying using lots of my dies for my cards recently, and my card today is another example of that.

I used four different die sets, beginning with the medallion.  My initial thought was to have a sympathy sentiment in the center, but that changed when I came across my Inkadinkado inchie set of cross stamps.  I used a scrap of slightly shimmery gold paper to cut the medallion, then stamped the cross on a bit of 'Very Vanilla' Stampin' Up card and heat embossed it with Stammpendous 'Detail Gold' powder.

 
I used the same off-white paper as the circle to die cut the background and the flower.  I used Ranger Distress 'Antique Linen' ink to frame the cross, as well as to edge the flower.  I then shaped the flower petals with a stylus and assembled the pieces using a gold glitter brad from American Crafts.
 
 
Next I die cut the leaves from some coordinating scraps of green papers and formed them with the stylus as well.


When I was ready for assembly, I ran the background through my Xyron sticker maker and affixed it to the green card which was cut at 5 1/2" x 4 1/4."  I used Matte Accents to attach the leaves and a Glue Dot to add the flower.  I layered the circle and the medallion both with foam tape before affixing them to complete the card.


I think this is a very elegant and tasteful card to present to a bereaved family member or friend.  I hope it has been a good inspiration for you, and I thank you for your visit today.
 
I'll be back in a couple of days with my first card for my Guest Designer spot at Beccy's Place.  We just might have some goodies in store so I do hope you'll come back and take a peek.
 
'Til next time.....
 
BIG Hugs!!!
CHRISTINE

Wednesday, January 29, 2014

Letterpress Style Thank You

I don't know about anyone else, but I am so ready for Spring.  This Winter has brought much colder weather than I have seen a quite some time, and I find that I am able to tolerate it much less.  We have been blessed with a mere fraction of the snow that some areas have had; and that's a very good thing as far as I am concerned.  With any blessings should come thanks, and "Thank You" just happens to be our theme at the Card A Day Blog this week.

I was reminded, by something in my wanderings around the web, that I haven't used my Spellbinders' Impressabilities in a long time. So I decided to get them out and use one for today's card.  If you're not familiar with Impressibilities, they are very thin metal templates that can be used in many ways; such as embossing/debossing, as a stencil, cut apart and the pieces used as embellishments.  I have used mine in a 'letterpress' style.  Letterpress is a style of printing where the type is set, ink is applied and the paper is pressed into the type to pick up the ink.  This method also leaves an impression in the paper.  This is, essentially, just what I did with my template.


I used a splatter mat to keep from getting ink on my table and applied ink directly from my stamp pad to the template.  I carefully placed my piece of cardstock on the inked template and put it in the proper sandwich to run through my Cuttlebug.  The result is a lightly embossed inked impression.   I inked the edges of this piece just a bit to help it stand out against the card base.


Once I had my embossed layer prepared, I wrapped three strips of 3/8" satin ribbon around the center.  I then die cut two layers for my sentiment.  These pieces were also inked just a bit on the edges.  I stamped my sentiment, and then layered all three pieces using foam tape.


This was a slightly messy project, but really quite easy to accomplish and is no problem at all to clean up.  I hope you'll decide to try this type of design style.  Even if you don't have the Impressabilities, you can use the same method with an embossing folder, and a deeper impression can be obtained.  You can see an example of that here.


Supplies:
     Paper:  Recollections
     Dies:  Spellbinders "Timeless Rectangle"
     Impressabilities:  Spellbinders "Flourish"
     Inks:  Tim Holtz Distress "Dusty Concord" by Ranger and Stampin' Up "Wisteria Wonder"
     Stamp:  Stampin' Up "Blooming with Kindness"
     Ribbons:  Ellen Hutson

'Til next time.....

Big HUGS!!!
CHRISTINE

Monday, October 7, 2013

Christmas Joy - Fold

Happy Monday!! (Or whatever day it is that you're seeing this.) I'm here with you today with my second Christmas card of the year.  This week at the Card A Day Blog we are using the inspiration of "Christmas and Animals."  I decided to use another fancy fold for my card, known as a 'joy-fold.'  I couldn't find anything to explain where the name originated, but it's a nice design.  There are lots of videos on YouTube showing how to make this style of card.  So I won't go into too much detail, but I think my photos will show you how easy this design is to make.  Then you can check out some of the videos for variations.

I wanted my card to fit the standard A2 sized envelope.  In this case I started with a card base cut at 5 1/2" x 6 1/4."  My paper was from a card stack with die cut edges and printed on both sides.  This was important because both sides of the paper will show.  The 5 1/2" measurement would be the height of my card.  I scored at 2" from the die cut edge to make the card width 4 1/4."  Okay, here is a photo:

 
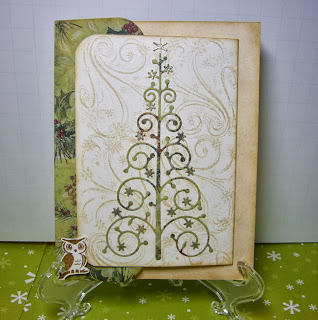
 I needed a second piece of card stock, and used a plain off-white on which I stamped a swirl background.  This piece was cut at 4 3/4" high x 6 1/2" wide and scored at 3 1/4" along the width.  Next I prepared the animals and the tree.  I stamped the three animals on the same off-white card, and cut them out by hand.  Then I used my Cuttlebug to die cut the tree using the design card.  I used a fine point glue pen to affix the tree and added some sparkle with a glitter pen. You can see the glitter in some of the photos, especially if you click on them to enlarge.


The tree was added to the front of the smaller card, and a piece of the design card was layered on the inside.  I also stamped the sentiment on the inside before affixing the two card pieces together.
 
 
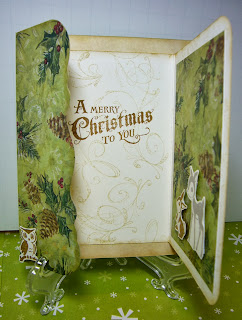
Before assembling the card I inked the edges of both pieces and rounded the corners of the smaller piece to coordinate with the die cut edge.  You can see the way the two pieces are layered in the next two pictures.  The fold of the base is to the left, while the fold of the liner with the greeting is to the right.


When the card is closed the left flap is closed first, with the right side closing over the left.  The card is held in the closed position by the sweet little owl who stands guard by the tree.  The owl is affixed with two layers of foam tape.  The bunny and the deer on the inside are affixed with a single layer of the foam tape.
 I hope you've enjoyed my card today.  Here is a final photo and then your details:
 
 
Supplies:
          Papers:  K & Company "Glad Tidings" by Susan Winget, Stampin' Up "Very Vanilla"
          Inks:  Ranger Distress Inks in "Antique Linen," "Vintage Photo" and "Pumice Stone"
          Stamps:  Inkadinkadoo "Sketchy Flourishes" and "Warm Holiday Wishes," Stampin' Up "Forest Friends" and WaltzingMouse Stamps "Complements of the Season"
          Die:  Memory Box "Snowflake Tree"
          Misc:  Zig 2-Way Glue fine point, Scotch ATG, Sakura "Clear Star" glitter pen, Crop-a-Dile Corner Chomper
 
Thank you so much for taking time out of your day to visit.  I hope you have a wonderful week!!
 
'Til next time.....
 
Big HUGS!!
CHRISTINE

Thursday, September 26, 2013

Fancy Fold Halloween Card

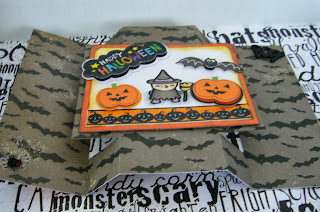
Hi everyone!  It's Halloween time over at the Card A Day Blog, and I have a cute fancy-fold card to show you.  My inspiration for this card came from Splitcoaststampers, but I have modified it slightly and changed the sizing.  I'll give you a look first, then go into the details.


I wanted my card to fit the standard A2 sized envelope, so I started with a card base cut at 5 1/2" x 8 1/2".  This card is actually a modified tri-shutter style, but with the different cuts and folds it features a centerpiece.  Here are the measurements:  make a cut 2 1/8" from each short side starting at 1" from the top and ending 1" from the bottom.  Turn the card and cut 1 1/16" starting at the previous cut and going in toward the center of the card.  Do this on all four corners. 
 
 
This photo of the back of my card should give you an idea of what you will have when you fold.  It works best to score your card (top and bottom) at the 2 1/8 and 3 3/16 points.  The 2 1/8 scores will make 'valley folds' and the 3 3/16 scores will make 'mountain folds.'This will give you the centerpiece of your card which should now measure 3 1/2" x 4 1/4".


In the sample I saw on SCS, the designer cut out two rectangles and then added a centerpiece.  I elected to simply cut around three sides and leave the center intact.

Next I built the centerpiece using an orange dp as a mat and a piece of white cardstock for my background.


I stamped and colored the little witch, the bottom border is a rub-on, and all the rest are stickers.  I used my 1/4" corner rounder for the top of the two layers and did some ink distressing around the edges.


You can see in the previous three photos that the stickers, themselves, are multi-layered.  Also, they are affixed with foam tape as is the full front piece.

This card can stand alone very nicely, as you will see in the next photo, or use an easel to feature it as I did in most of my photos.


I hope you've enjoyed my fun little card.  It was actually fairly quick to make; especially since I used ready made embellishments.  If you have questions, please leave them in the comments with a way to contact you.  I will answer as quickly as I can.

Here are some details for you:
     Paper:  Making Memories "Spook Alley" pack-card base
     Stamp:  Pink By Design "Guess Who" set
     Inks:  Ranger Distress "Spiced Marmalade" and "Black Soot" and Versamark
     Embossing Powder:  Stampendous "Detail Black"
     Embellishments:  Recollections Layered Accents and Rub-On, Jolee's boutique Spider, Recollections BOO!

Thanks for visiting!  'Til next time...

Big HUGS!
CHRISTINE

Thursday, July 18, 2013

smooth sailing

"How happy is the sailor's life..."   Isaac Bickerstaffe   Over at the Card A Day Blog we are inspiring/challenging you with the theme of "NEW," new home, new job, new school, new anything you can think of.  For my inspiration, I have created a card that might apply to many things 'new' as there are often "rough seas" in any new endeavor.  There may not be too many of us looking forward to a new sailboat, but that is the image I used for my creation.  I liked the idea of clear skies and smooth seas, so that is how I created my sentiment.  Here is your first look at my card:


As you can see, this is my sentiment.  I created it in a document, choosing the font style and color, and printed it on white cardstock.  I cut it with a Spellbinder's die, did a little inking while still in the die, added some matching rhinestones and mounted it with foam tape.  You can see the layering in the next pic.


The sailboat I used is from Stampin' Up.  I stamped directly on the card layer; I wanted my card to be very CAS.  Here is the finished card:


This was a very fast card to create, and, happily, I had the perfect scrap pieces at hand.  So, all I needed to do was locate my stamp and create the sentiment!  Not too many details for you, but here they are:

          Stamp:  Stampin' Up 'Sail Away' single stamp
          Inks:  Tim Holtz by Ranger Distress Ink 'Chipped Saphire' and VersaMagic Chalk Ink 'Sea Breeze'
          Die:  Spellbinder's 'Labels 4"
          Bling:  The Paper Studio birthstone gems

I'm really starting to love this CAS style, but, while I love the color blue, I think it's time to bring in some other colors for my next few posts.  What d'you think?

Sea you again soon!!

Big HUGS!
CHRISTINE

Saturday, April 20, 2013

Celebrate MOTHER Every Day

It feels like such a long time since I was last with you, but I've been a bit under the weather for most of the past two weeks.  I'm feeling better, not great, but definitely better, and I have a card to show you which was made for the Card A Day Blog theme, Mother's Day.  I like to think of every day as Mother's Day.  Where would any of us be without our moms, after all?  My mom has been gone a long time, but not a day goes by that I don't think about her.

The image stamp that I used for my card is one that I've had for quite awhile.  It's a silhouette stamp, and I was never sure how I wanted to use it, but while I was looking through my stamps for an idea for my card, this stamp practically jumped out at me.  I knew I wanted flowers, and I knew I wanted a child or children, and I wanted something playful.  Well, here it is:


I decided that, rather than use the silhouette in the regular black on white that we are so accustomed to seeing, I would stamp my silhouette in reverse, that is, white on black.  It's a little unexpected, and I thought it would be a bit more fun.  I layered it with foam tape on a piece of yellow card leaving a narrow border.  On a white card base, 4 1/4x5 1/2, I applied three pieces of a bright floral dp.  I used a wide strip in the center, and triangles on the sides.  I then affixed the matted image with more foam tape for extra dimension.  My last addition to the front was a simple tag stamped with the word, mother.


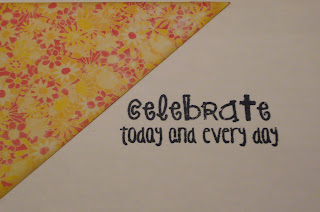
I decided to bring a little color to the inside of my card by adding another triangle of the dp in one corner before stamping the sentiment.


And there you have it, a really quick and easy card that you can put together for your mother or adapt the design for any other occasion.

Thanks for coming to visit!!  Here are your deets:

          Papers:  Recollections black and yellow, Georgia Pacific white, Generations Stackers Primary Color Collection
          Stamps:  Hero Arts 'Dancing With Flowers', Pink By Design (no title, but it might be 'hello, life'), My Pink Stamper 'family & friends'
          Inks:  ColorBox 'Frost White', Memento 'Tuxedo Black', Tim Holtz Distress 'Antique Linen' (used for a bit of inking on the dp)

I am also entering this card in the Creative Digital Arts Center Anything Goes progressive challenge.  Lots of fun happening at CDAC, so come on by and check us out!!

Big HUGS,
CHRISTINE

Saturday, December 1, 2012

Sharing Joy

Hello Friends!

It's time to share another design that I've made for the Card A Day Blog.  I'm rounding off a week of Holiday Thank You cards, and I wanted my design to still look like Christmas, but perhaps be a little less obvious.  As I've mentioned before (and haven't shared with you YET) I've been working on some projects with a troop of Girl Scouts.  Because of this I have even more scraps than usual, so I wanted to be sure to use some of those scraps for my card.  Don't want to break with tradition, now, do we?  (lol) 

For my design, I started with a 5" x 4 1/4" card base.  Yes, even this was a leftover.  We had cut lots of card bases, and this one turned out to be just a bit smaller that it should have been.  Well, I wasn't going to let it go to waste, was I?!

 I had decided to create a simple background with some stamps using the stamp-off method because I didn't want the color to be too vibrant, kind of like the holiday season fading into memory.  I went hunting through my stamps and found just exactly what I needed.  I also came up with the perfect greeting for the card front.  Once I had those elements I needed a way to 'frame' them, and remembered some leftover pieces from cutting rosettes that I had decided to keep for possible borders.  I had quite a few from which to choose, so I decided on red because I wanted to use traditional Christmas colors and already had green, silver and blue (along with a little gingerbread brown).  Here is your first look:


I stamped the design images directly on the card base after first stamping off on a piece of scrap paper to remove some of the ink.  I chose stamps that were representative of the season without necessarily being too overt.  The borders are the cast-off pieces of some die-cut rosettes that are shaped like snowflakes.  I roughed up the edges to lift them a bit off the card.  The greeting was stamped on a piece of white card which I inked around the edges and  then mounted with foam squares.  The next three photos are closer shots of the different areas of the card.


I know the greeting doesn't look too clear in the photo.  It reads, "The true joy of the season is in the love shared with family and friends."  I wanted to reflect that greeting in my sentiment on the inside.


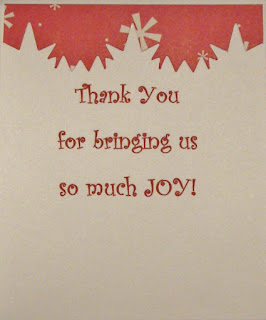
I created the sentiment in MS Word.  I was happy to find a font that matched the stamped greeting fairly well.  I chose to print the sentiment in red to match the remaining 'border' piece that I wanted to use.  I think it worked out quite nicely.

Here is your full view of the front of the card:


It's a rather simple card, but I think it's actually one of my favorites of my recent cards.  I hope you've enjoyed it, too.

Now for those little details:
  Stamps:  Greeting from Great Impressions, Images from Craft Smart (Michael's)
  Inks:  Martha Stewart 'Sterling Metallic," Ranger Distress "Pine Needles" and "Vintage Photo" and Tsukineko Brilliance "Pearlescent Sky Blue"
  Border:  Leftover cuts from Sizzix Alterations "Snowflake Rosette"
  Paper:  Recollections "Jolly Jamboree" and generic white card stock

Once again, I am honored by your visit, and I thank you.  It's really fun for me to be able to share my creations with you.

Until next time.....

BIG HUGS!
CHRISTINE