Followers

Showing posts with label Unity. Show all posts

Thursday, August 29, 2013

Let Your Light Shine

Hi everyone!  So happy to have you visit today.  We've been having so many bright, sunny days around here in the central U.S.  So, as today's designer for the Card A Day Blog, using the theme of "With Faith"  I decided to go along with the idea of light.  Also, since my ds arrived today for a visit, this card became a little bit of a collaboration.

At the time ds arrived, I already had my basic concept for the card, and had some of the elements prepared as well.  Here is your first look at the card:


I used a blue card stock for the background, and used a border design embossing folder inked with Versamark to give the embossing some extra dimension.  The cross and the sentiment were stamped onto the same blue card, and embossed using Versamark and silver embossing powder.  I used a Versamarker and the same embossing powder to frame the sentiment.  The sentiment piece was die cut and the cross was cut by hand.


A bit of ribbon was attached to the background piece, and the sentiment and cross were both layered using foam tape.


On the inside I simply stamped the cross with the watermark ink for a very subtle look, then stamped and embossed the greeting with the silver powder.


Here is a closer shot of the inside:


Probably the trickiest part in making this card was getting the embossing just right on the background paper.  I had to be sure the paper was cut for a perfectly (almost) symmetrical fit.  I also had to be aware of which side of the folder should be inked.  So if you try this technique, just be sure to consider whether you want to ink the embossed side or the debossed side.

 
When preparing the elements for this design, I started thinking about all the different occasions for which this card might be used.  It seems appropriate for get well, birthday, certainly for Easter, or simply to let someone know you've been thinking about them.  I'm sure you could think of even more ideas.

I truly appreciate having you take time out of your day to visit.  You always put a smile on my face!!

'Til next time.....

Big HUGS!
CHRISTINE

Saturday, December 3, 2011

For Unto Us.....

Yes, a Child is born!  My post today is once again a card made for the Card A Day Blog.  Our inspiration theme this week is 'Christmas and Children' and I have chosen to make a card representing the very special Child whose birth we celebrate with the holiday season.  Since I was thinking about children, I wanted my creation to be a bit more lighthearted - not one of the rather formal cards I usually tend to make.  It all started with a little lamb; think Lamb of God, think animals at the stable, think cute for children.  Add Baby Jesus in the manger with a golden star shining overhead, and there you have it.


The sweet little lamb is cut from Cricut cartdridge 'Create A Critter.'  I wanted her to look festive so I added Christmas Red Stickles to her bows.


The manger scene, the sentiment and the 'Star in the East' were stamped from Unity Stamp itty bitty set 'A Child Is Born,' and heat embossed.  I hand cut the manger and used Spellbinders dies for the sentiment.  I added the patterned paper strip to ground the images - didn't want them to look like they were just floating.


For the inside of the card, I stamped the sentiment directly on the card, added another embossed star, and, to bring the outside colors to the inside, I used a strip of the same patterned paper, but in the opposite orientation.


And for the final reveal, here's the straight-on pic of the card front.


Hope you like my cute little card.  It's quite easy to make and fairly quick to reproduce.

The Details:
          Die Cuts:  Cricut cartridge 'Create A Critter,' Spellbinders Circles and Scallop Circles
          Paper:  A2 card base Waussau white card stock, K&Company 'Yultide,' Stampin' Up Very Vanilla
          Stamps:  Stampin' Up 'Beautiful Season,' Unity 'A Child Is Born'
          Inks:  Versamark, Versafine Onyx Black, Tim Holtz by Ranger 'Antique Linen' Distress Ink and Stampin' Up Lucky Limeade (both used for shading and edging)
          Embossing Powder:  Stampendous Detail Black and Detail Gold

Thanks for visiting today!  See you again soon!!!

Always keep your creative genius happy and well-fed!

CHRISTINE


Tuesday, September 27, 2011

Best Witches.....

It's 'Halloween' week at the Card A Day Blog, and I decided I wanted to try cute rather than scary.  If you're new here from CADB, welcome.  I'm glad to have you here for a visit, and hope you'll decide to become a follower.

As I was foraging through my Halloween goodies to come up with an idea for my card, I happened upon some Sizzix dies that I had forgotten about.  I had been considering a newish stamp set that I had, and thought the combination would make for a fun card.  It all started with a certain cute little Halloween witch.................


I stamped her on white cardstock, colored her with markers and paper-pieced her dress.  I die-cut the ghost, and then backed his head with a shimmery scrap to highlight the eyes and mouth.  Then I inked him with some blue and gray for dimension.  I die-cut the word 'Beware' from a piece of gray and black patterned paper, but instead of using the letters, I used the negative and backed it with some orange that I had darkened a bit with gray ink.

Next I went to work on the jack-o-lanterns.  I had two different dies, so I cut them both twice, and reversed the colors for the eyes and mouths.  I colored the stems, and inked around the eyes, mouths and outer edges.

The card base is a two-sided patterned paper.  I liked the green for the outside of the card, but it was a bit bright.  I used gray ink on a cloud background stamp to darken the green a little.  You really can't see the clouds, but it provides the needed effect.  I used a torn paper mask so as not to stamp the lower part of the card.  Then I added a dark bottom border using more of the gray/black striped paper.

Most of the elements were mounted with dimensionals.  You can see all the layering in the next photo.


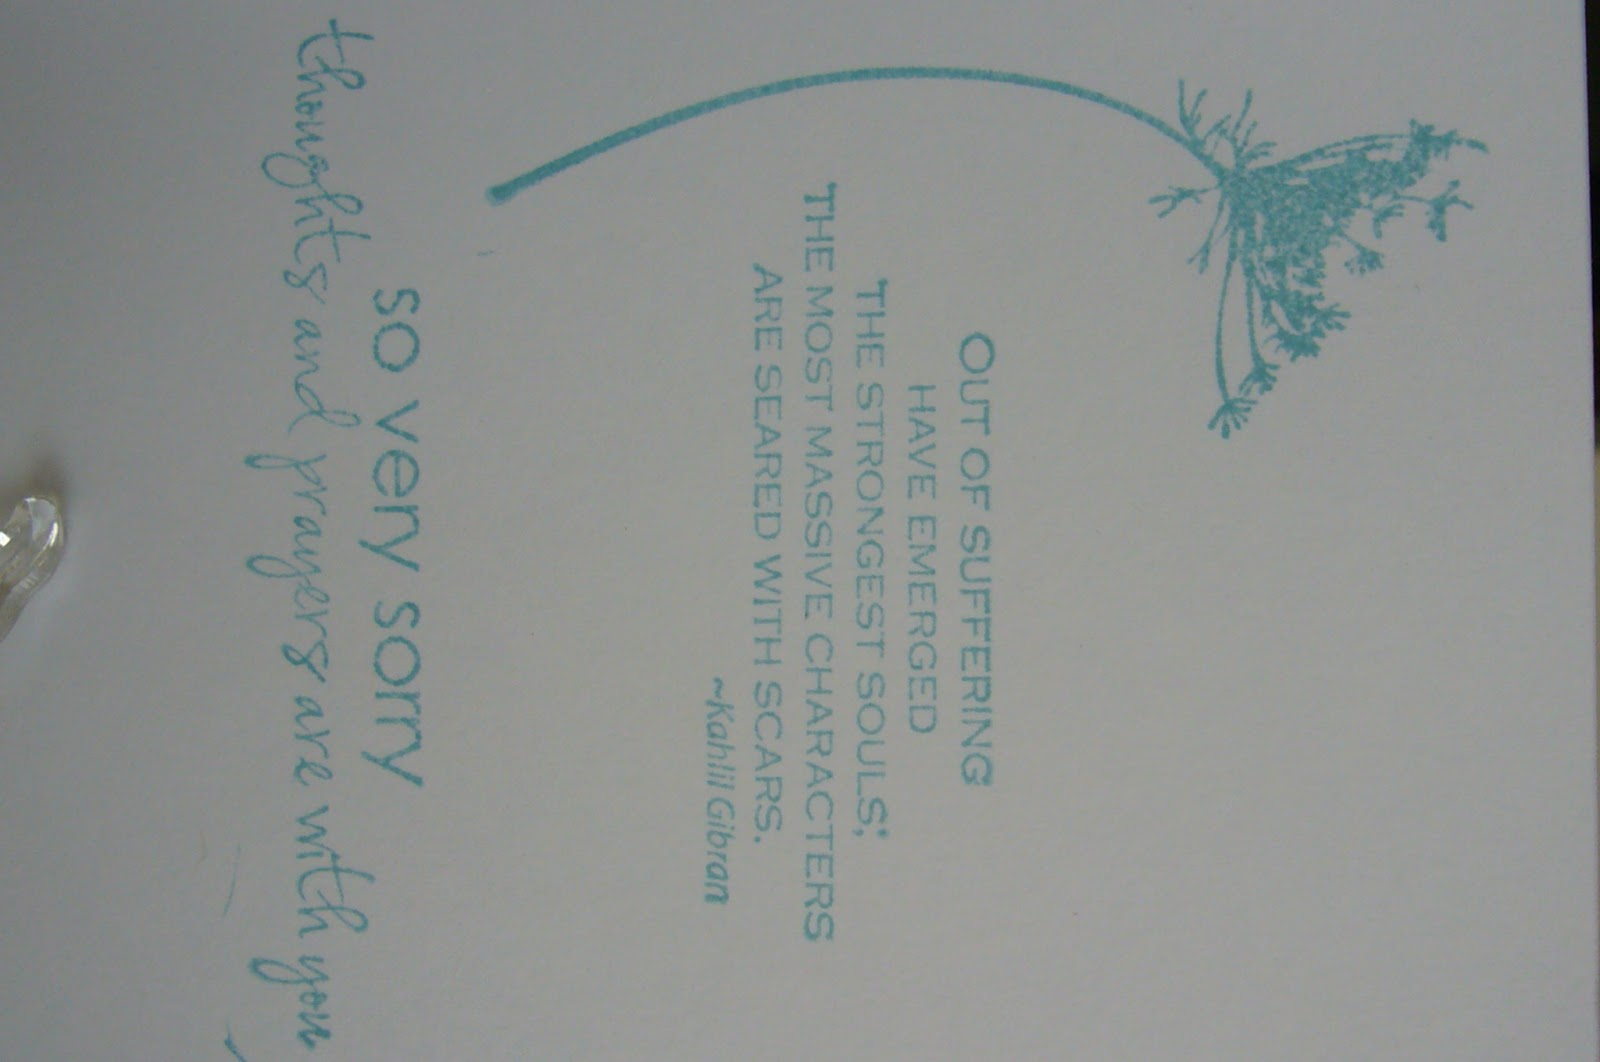
The reverse side of the card stock is sort of a wild flame pattern.  It's in the wrong orientation for fire, and I thought I would insert a liner.  Flipping the card open, I decided it would be a fun surprise to leave it as it was, and just added a sentiment and a spot for a signature which carried over the colors from the outside.


Here's a closer shot of the sentiment!

I had so much fun putting this card together.  Hope you like it!!


Here's the recipe:
     Stamps:  Unity Bella Blvd 'Best Witches'; Impression-Obsession 'Clouds'
     Dies:  Sizzix Brenda Pinnick Pumpkin Face, Ghost, Jack-O-Lantern #2
     Inks:  Stampin' Up Basic Gray and Bashful Blue; Versafine Onyx Black
     Markers:  Copic; Tombow
     Cardstock:  Glitz Design Hallow Flames; Generations Stackers; Recollections; Stampin' Up
     Scissors:  Fiskars Paper Edgers

I hope you have a sec to leave a comment........I'm really glad you stopped by today!


And remember:  keep your creative genius flowing.........

CHRISTINE

Tuesday, June 21, 2011

AND THE WINNER IS.......

No, I'm not making it that easy.  I told you my winner in the Creative EdVentures First Ever Blog Hop will be announced tomorrow.  (tee hee)  But, since you were nice enough to stop by, I do have a card to show you.

A long-time friend of my husband lost his dad last week.  The family knew it was coming, but, of course, it's always a difficult time, and so sad that it came just before Father's Day.

I wanted to use a soft color scheme for this card.  I'm happy with the pretty blue.  This photo shows the signature page on the inside:

Here is a full view of the inside of the card:


I was very pleased with the soft simplicity of the card front.  I used generic papers, and stamped the white cardstock to make my own background design paper.

I thought it might be hard to read the sentiment, so here's a closer view.

I mentioned the paper.  Here are the other ingredients:
Spellbinders dies: Plain and Scalloped Ovals, Fancy Tags and Lacy Squares
Stampin' Up! Baja Breeze ink

Thanks for visiting today, and don't forget to come back tomorrow to see if you're a winner!!!

Keep your creative genius flowing.....
Christine