Followers

Thursday, December 30, 2010

HAPPY NEW YEAR'S EVE EVE!

Just poppin' in for a quick sec to say 'hi.'  We had about five inches of snow on the ground yesterday morning from the storm that came through on Christmas Eve.  I wish I had taken some pictures.  Now, it's 54 degrees, and the snow has vanished.  I can't say I miss it, but it was pretty for Christmas.

I'll be getting more cards up for you soon.  I have to give my main 'puter a restart; it's down and that's where all my pics are stored.  I haven't made anything since Christmas morning, and my fingers are itching to create.  I received some wonderful gifts, including some great stamps from my lovely step-daughter, and I got a Xyron refill (although I don't have a Xyron yet; guess it's still on the way ;) ).  I also received a book on stamping as well as a new knitting book!  Oh, and my darling sweet daughter gave me a Scrap'n'Tote!!!  She helped me organize my carts yesterday afternoon.  Such fun!  Of course, it's full to overflowing.  So then she told me I couldn't get any more carts until next Christmas (or at least until my birthday in November).  I tried to compromise by asking for New Year or at least Valentine's Day??  After all, everyone has really great deals on carts right now.  Well, she settled for Mother's Day.  I'm not too sure that's going to work.  We'll just have to wait and see.

If you have plans to be out on New Year's Eve, please be safe.  I'll see you on the other side of the 1st.


HAPPY NEW YEAR ! ! ! ! ! 

Christine

Friday, December 24, 2010

MERRY CHRISTMAS TO ALL.....Final two cards!!

The texture doesn't show up too well on the first card, but it looks really pretty.  The second card is one of three cards I made with an origami tree.  All three cards are quite different, but I got a pic of only this one.


HOPE YOU HAVE THE BEST CHRISTMAS EVER!!  LOOKING FORWARD TO A BRIGHT, HAPPY, HEALTHY AND VERY CREATIVE NEW YEAR!!!!!

Remember to keep your creative genius flowing.........
Christine 
 

Last Day for Christmas creations...............

I'm not going into long descriptions today, just pics.  So, if you have questions, please leave comments and I will be sure to get back to you soon.

These cards fit into the 'cute' category.  I hope you like them.  (If  you're a Hive member, you may have seen these.  If you're not, come join the fun.  It's a great place to play.  Click on the Hive button in the left column.)


Thursday, December 23, 2010

More Cards, More Cards.......

If you saw my previous post you will recognize the paper on this card.  My sister, also a cardmaker, cut out the word JOY to use the negative.  I kept the letters figuring I could make use of them.  I had this sort of fuzzy ribbon from Michael's that I'd been wanting to use, so this is what I came up with.  The base card is the same generic white that I've used on quite a few of my cards (simply because I have so much of it).  The mat paper is open stock from JoAnns, and the dp is the BasicGrey I used on one of the boxes.  The strip at the bottom is the reverse side of the tree paper.  I edged the letters with a Sakura glitter pen.


As you can see,this next card uses the same fuzzy ribbon.  I used PTI paper for the mat run through the Cuttlebug Swiss Dots folder.  The dots are inked with ColorBox gold.  The poinsettia image is embossed with a Sizzix folder, and colored with Lumin Arte Twinkling H2O's.  I used an EK Success scalloped scallop punch for the borders.

I welcome and appreciate your comments.  Hope you have all your holiday prep done.  I certainly don't, but I'm somewhat of a last minuter myself.  Really have to get over that some day.

Thanks for visiting!

Keep your creative genius flowing..........

Christine 


Last Two Days!!

Oh, no, it's my last two days to post my Christmas cards.  I made some gift card boxes this afternoon to go along with the gift card holders I made yesterday.  I wasn't trying to get too matchy, so I just picked out some papers, took a few measurements, and started to cut and fold.  After the first one, the rest were fairly easy - as long as I did the scoring properly.  Here they are:


The green paper is PTI, the dps are BasicGrey.  I cut them 6 x 9 with 2 one inch folds on the short ends and a single one inch fold on the long sides.  Fit my card holders quite nicely.

I'll be posting a few more cards shortly.


Keep your creative genius flowing........

Christine

Quick & Easy Gift Card Holders

I had some fun this evening making a few gift card holders, so I thought I'd get them up right away.  I made them with a Cricut cut from the Cindy Loo cart.  It was fairly easy to get the size using my Gypsy.  I could fit two on an 8 1/2 x 11 page.  I used K & Company papers.  It's not as heavy as card stock, but worked well.  I used stamps from PTI, Recollections and Inkadinkado with Stampendous gold embossing powder.  I also used Nestabilities Petite Scallop Circle and Labels Four.  Hope you like them.


Merry Christmas and many blessings to all!

Christine

Tuesday, December 21, 2010

One Stamp, Three Looks

Only three more days before Christmas......one of these years I will be ready by this time.  Unfortunately, as you may have guessed, this is not that year.  The good new is that I've learned not to be too hard on myself if I don't have everything down to a schedule.  (I wish my dh would learn that lesson; he's much too hard on himself.)  It's so much more pleasant to let go of the stress and enjoy some fun with the family.  It really is okay if the tree doesn't have those last few ornaments - no one will notice.

The cards I'm showing today were made with a stamp I found at CHA, Chicago, last summer.  The display was just beautiful.  The idea is to stamp multiples, cut them up and then layer the different cuts.  My test sample was done on ordinary computer paper.  I stamped it only once and then colored it with markers.  I traced some of the lines with a glitter pen.  It look pretty nice, and I was glad I had bought the two stamps I chose.  I really didn't expect to use the sample.  Later I bought some Stickles and dressed up that same sample.  The result is the card below.  I was quite peased with how it turned out.  The base card is generic white card stock topped with a dp (probably DCWV).  The striped paper is a hand-made(not by me) with it's own touch of sparkle (also purchased at CHA).


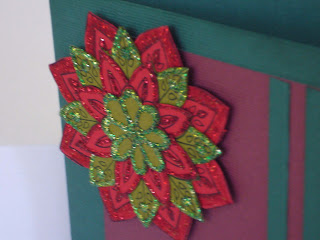
 This next card was done with the same stamp.  I stamped six times on both red and green PTI paper, and cut out each layer.  I traced with a glitter pen on the areas that would show and layered the pieces.  I didn't want too much thickness, so I didn't use dimensionals.  The base card, again, is basic generic white.  The mat is another hand-made paper; one side has the glitter spots and the flip side has fibers running through it.  They don't show up well in the photos, but I wanted to used both sides which became possible with the gate-fold style of the card.


 In this third card, the image was made with the reverse cuts of the above; this one has a green center while the above has the red center.  I wanted a smaller piece, so I used only four layers instead of all six.  I also traced over the design lines with Stickles.  The paper colors don't seem to match too well in the photo, but they did look good in person.  The base card and mat were made with textured card stock from JoAnns.


 Feature stamp:  Holly Berry House
Word stamps:  JustRite Christmas Nested Sentiments and PapertreyInk Signature Christmas
Ink:  Versafine and studio g

Thanks for spending some time with me.  I really appreciate comments.


Keep your creative genius flowing.....
Christine 

Monday, December 20, 2010

Iris Fold Ornament

This was my second Iris Fold card, even though I posted the Halloween cards in between.  If you saw my earlier posts, you've seen my Iris Fold card, Christmas tree.  The DP is from Michaels and the stamps are PapertreyInk.  The card stock is generic white.


I used a corner rounder on the DP as well as my favorite Fiskars lace corner punch.  I really enjoy the process of these cards.  It's relaxing to simply follow the numbers and watch the design come to life.

Thanks for visiting.


Keep your creative genius flowing.....

Christine 

Not Nearly Enough Time

It seems I may never come to grips with the fact that time is not under my control.  As much as I would like, I cannot add hours to the day or days to the week.  That said, I now have only a few days remaining to show the rest of my Christmas cards - at least the ones I remembered to photograph.

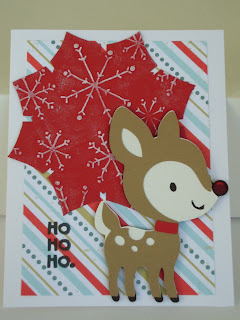
The cards I'm showing here were made with paper from PapertreyInk and DCWV.  The reindeer is cut from Cricut Cart Very Merry Tags.  I used the hide contours feature on my Gypsy to cut just the reindeer without the tag.  The first card uses the cut-out reindeer, while the second card uses the remaining stencil.

I also used a Fiskars lace corner punch, ribbon and embellishments from my stash, Stickles  and my Cuttlebug.  I could not, for the life of me, find the stamps I used, so I can't give you that info just now, but the stamping and inking were done with Tim Holtz and ColorBox.


I'll have more up shortly.  Thanks for looking, and don't forget to let me know you visited.

Keep your creative genius flowing.....
Christine

Sunday, December 12, 2010

Back to CHRISTMAS

Now that I finally have Thanksgiving behind me, I can get back to posting my Christmas cards.  I've got lots to show, so the descriptions might be a bit brief or I'll never get them all up.  Feel free to ask questions in the comments section, and I'll get back to you with details.


This turned out to be one of my favorite cards.  Unfortunately, it doesn't show up very well in the photos.  The tree is embossed with a Cuttlebug folder and lightly inked.  The corners are Cricut cuts.  The outside stamp might be Recollections, but I can't find the card so I'm not sure, and the inside stamp is from JustRite.

Many more to come.  Stay tuned.

Keep your creative genius flowing.....

CHRISTINE

THANKSGIVING?!?!

Okay, I know, I can be a little slow at the uptake sometimes.  I did get an early Christmas card post up.  Anyway, I usually take something gifty, like candleholders for her collection or handmade ornaments for the Christmas tree, to my dmil when we go for Thanksgiving dinner, but she's trying not to collect any more stuff.  I didn't want to go emptyhanded, though, so this year I did something a bit different.  I decided to make tags for the table.  It was going to be a small gathering, which meant we didn't really need place cards.  Instead, I made up a little game.  I've tried before to have everyone say something about why they are thankful, but they're a little shy about that sort of thing.  What I did this time, since I do like to remember what the holiday is about, is make tags that we could write on.  Before filling our plates, everyone wrote three things for which they are thankful.  I collected the tags, and we had our dinner.  Between dinner and dessert I passed out the tags so that no one got their own, and we all read someone else's gratefulness statements.  That way no one felt awkward about speaking.  There was even a prize at the end.  I made one tag slightly different from the rest.  The person with that tag got the prize.  All in all it was actually quite nice.  Here are the tags; very simple.


I stamped some generic white cardstock with a tag stamp from Stampology Autumn Leaves set.  I punched a 1/4" hole for the ribbon, and then colored the leaves with markers. The Happy Thanksgiving greeting is from TCP Studio Autumn Harvest and is stamped with Versafine Vintage Sepia ink.  I inked the edges and added the ribbon (from stash).  I added the lines on the back for ease of writing.  If you look closely, you'll see that one tag has a red leaf right in the center.  That one was for the prize.

I hope your Thanksgiving was as warm and peaceful as mine was.  Thanks for looking and

Keep your creative genius flowing!

CHRISTINE 

Tuesday, November 23, 2010

Christmas Bells Are Ringing

Getting back to the Christmas cards, here is one that is embossed with a Sissix brass folder and colored with LuminArts Twinkling H2Os.

The green and red papers are nice textured papers from JoAnn's, I think, that were clearance priced, and the white paper is generic from stash.  The square gold brads are also from stash.  The punch is Lace from Fiskars.

Thanks for looking!

Keep YOUR creative genius flowing.........

Christine 

Decorables Greeting Cards and Art: It's Giveaway Time!!!

Decorables Greeting Cards and Art: It's Giveaway Time!!!

Pay Robi a visit and say 'hello.'  She's got a great giveaway!

Friday, November 19, 2010

HOW TIME FLIES!!

I think I need to start getting caught up on posts.  I've been making bunches of cards, so I have lots to show.  They'll be mostly Christmas cards, but others will be mixed in for a little variety.

I'll start off with two cards I made using parchment.  They were both stamped and colored, and both have embossing and piercing.  Also, both cards are layered with purchased handmade papers.  Love the look of those handmade papers.

The first card used stamps from Sweet Stamps and PAPERTREYink and was colored with Pergamano  Perga Colours Markers:

This card was stamped with Holly Berry House and My Pink Stamper and colored with Derwent Pencils.  Both cards used generic white cardstock.  Unfortunately, the photos don't show off the texture of the piercing and embossing, but I really love the effect.

Thanks for looking, and please leave comments.  I'll have more soon, so please check back.  And remember:


Keep YOUR Creative Genie-ous flowing!!

Christine

Sunday, October 31, 2010

BOO ! !

HAPPY HALLOWEEN to all the friendly ghosts and goblins out there!!

I hope everyone is having a wonderful weekend.  It has been perfect here, in the St. Louis area.  The wind and rain of a few days ago took alot of the leaves off the trees, but much of the color still remains and the temperatures are still quite mild.

It seems like it should be the last day to post my Halloween cards, so here they are.  I only did a few this year; won't keep you here too long.

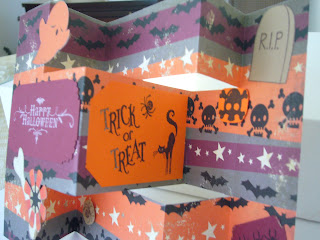
This one is my first shutter card.  It was fun gathering the elements to add to it.  I didn't really need much; the paper did most of the work.


The next two cards are using iris folding.  It's really a fun technique; the effects can be so different depending on the papers used.

 This one is my favorite.  I don't  know if it shows up too well, but I like how the flame and the black design on the paper make it look even more 3D.


I hope you like these.  They were a blast to make.  If you want details, please leave a comment and I'll get back to you.  Even if you don't want details, leave a comment to let me know what you think.  I'd love to have you follow me; I have lots more coming soon.

Keep YOUR Creative Genie-ous flowing.............. 

Christine 


Monday, October 25, 2010

My First Iris Fold Card

Hope everyone had a nice weekend.  I decided it was no longer too early to start posting Christmas cards, so here is my first for this year.  I had seen iris folding, but had never done it.  Then, when I was at CHA this past summer, I saw  packs for Christmas cards that included 4 card fronts plus the folding pattern.  So, I bought a few, and here is my first attempt.  The hardest part, and it isn't really, was cutting and folding the strips.  The rest is basic, but it looks very intricate and quite nice once finished.

Paper used is PapertreyInk, stamp Recollections,  Ink Colorbox pigment gold, no name on IF card pack.
Thanks for looking.  I appreciate your comments.

Keep your Creative Genie-ous flowing!!

CHRISTINE 

Thursday, October 21, 2010

Owl Birthday

This card was lots of fun to make.  It was for my dd's birthday.  She's a huge Harry Potter fan, and she loves his owl, Hedwig.  This was my interpretation using Create-a-Critter's owl.  I got the other birds on the inside of the card from various other carts.
Her google eyes got stuck, but I think she's cute that way.  I used DCWV for the two mats, the lettering and Hedwig's wings and front.  The other paper is generic.  The embossing is Cuttlebug Happy Birthday folder.
I was playing around with my Expression and my Gypsy trying to learn the different functions.  I've learned alot since I made this card, but I think it turned out kinda cute.

Leave a comment if you have a sec, and thanks for looking!

Christine 

Saturday, October 16, 2010

Fall Birthday Card

This is a very simple card; not that it was easy for me to make, just not frilly.   It's one of my first attempts at parchment/vellum work and coloring with pencils.  The image is the October flower, the Marigold.  I used a generic card for the base and Recollections ivory for the image backing.  The mat is from DCWV Glitter Mat Stack.  I love that little stack!  I don't remember which set the 'mother' stamp is from, but the 'happy birthday' on the inside is from Urban Design by PAPERTREYink.  The other inside stamp I believe is from Inkadinkado; ink is studio g.


Thanks so much for looking, and don't forget to leave a comment!  But please be gentle, and remember, I'm still really new at this cardmaking and blogging stuff.

Lots of love and HAPPY CRAFTING!
CHRISTINE 

WONDERFUL FALL

It's a beautiful autumn Saturday morning here, in Missouri.  The sunshine is showing all the colors to their utmost.  I was inspired yesterday to use something of the season to make a card for my mother-in-law, whose birthday is in a few days so I had my DD look up the October flower, which is the Marigold.  Once I get the pic uploaded, I'll give a description.  Off to the camera, scanner, whatever.....I'll get it figured out.  In the meantime, have a glorious day out there!!!!!

Thursday, October 14, 2010

Let's See How It Goes!

Okay, then.  I'm brand new at this, and right now I feel as though I'm talking to myself.  Hopefully that will change as time goes on.  My objective for this blog is to showcase my crafty work and share my favorite blogs with other crafty people.  I've been working on greeting cards lately, and as soon as I figure out how this whole thing works, I'll get some photos up for all to see.

Thanks for visiting, and don't forget to leave a comment!