Followers

Thursday, December 12, 2013

A Winter's Night

As we speed through the remaining days until Christmas I bring you my final card of 2013 for the Card A Day Blog.  Our last theme of the year is "Snow" so I have made a quick, but very striking, card for you.  It has been very cold and icy in our area, so I was inspired to make a card which depicts that feeling. 

I started with a 4" x 5 1/4" piece of 'In the Navy' cardstock from Gina K Designs for the look of a night-time background.

I used two dies to cut the pieces for my scene from a scrap of shimmery off-white card, and used the same scrap to cut a piece which I ran through my curvy crimper for the snowy groundcover.


The die cut border and the snow were affixed with foam tape and I used tacky glue to attach the tree.  I left many of the branches and snowflakes free, but tacked some of them down using the same glue.


I affixed the front panel with the foam tape to the A2-sized kraft card base, and then used a glitter pen to add a little bit of sparkle around the edges of the panel as well as some of the snowflakes.  I hope you can see the dimension in this angled photo.  You also get a peek of the inside.


I had trimmed the navy piece for the front panel as well as the cut snowy border since it was longer than I needed, so I used those leftover pieces to bring the design to the inside of the card.


This really was a no fuss, no muss card.  The intricate dies cut beautifully with the cardstock I used.  If using a lighter-weight paper it can be helpful to use a piece of waxed paper between the die and the design paper for easier removal of the cut.

Thanks for stopping by.  I always love reading your comments.

Here are the details:
          Dies:  Memory Box 'Frostyville Border' and Snowflake Tree
          Paper:  Gina K Designs 'In the Navy' and Stampin' Up 'Kraft'
          Pen:  Sakura Gelly Roll 'Clear Star'
          Adhesives:  Scotch 'Quick-Drying Tacky Glue' and ATG

'Til next time.....

Big HUGS!!
CHRISTINE

Monday, December 2, 2013

CHEERS for the New Year

Hi, everyone!  Well, December is upon us, and the holiday season is in full swing.  We're sharing some "New Year" card inspiration over at the Card A Day Blog.  The card I have for you today was done during a Stampin' Up session.  So, as you might imagine, it was made using all Stampin' Up products.

The card base (A2 size 5 1/2" x 4 1/4") and stamped layer (5" x 3 3/4") were cut from 'Very Vanilla' card stock.

The stamping was done using the "Happy Hour" stamp set.  SO cute.  The design paper was cut at 1" x 3 3/4" and mounted on a piece of card just slightly wider but the same length.


The label pieces were made using the "Labels Collection Framelits Dies" and the accent piece was punched using a 1" circle punch and mounted on a 1 1/4" scalloped circle.


All the layers were affixed using double sided adhesive except for the accent piece, which was mounted with foam taped for just that little bit of dimension.  Some inking was done to the card front before mounting to the card base, just enough to help it stand out.


So that's it!  Quick and easy enough for multiple card-making.  I hope you're enjoying your card making and all your other preparations for this wonderful time of year.

Thanks for visiting, and 'til next time.....

Big HUGS!!!
CHRISTINE

Monday, November 25, 2013

CHRISTMAS THANK YOU

At the Card A Day Blog we are showing examples of "Christmas Thank You" cards this week.  I wanted to stay in the spirit of Christmas, but I didn't want my card to be too 'Christmas-y' looking.  So, I used a little gold and a lot of flourish, and came up with a tasteful, but quick-to-make card.

I started by choosing the stamp for the sentiment.  I knew I wanted something with a little bit of the flourish I was planning, and a Just Rite 'Be Happy' set provided the perfect stamp.  I used my favorite Versafine 'Onyx Black' ink for stamping.


I used a die set from Spellbinders to cut the layering pieces.  You should be able to see some embossing in some of the photos.


I chose black and white for the wonderful contrast and the formal look.   The die cut pieces are layered using foam tape and mounted on a patterned paper backed with solid black.  The gold card stock is from Stampin' Up and the solid black as well as the patterned paper are from Recollections.


The whole layered piece was then affixed using my Scotch ATG to a solid white Georgia Pacific card base.  You can see the dimension a bit better in the next photo.


As you can see, a quick and easy, but still very elegant design.

Thank you so very much for your visit!  I'll see you again soon.

'Til next time.....

Big HUGS!!!
CHRISTINE

Wednesday, November 13, 2013

Shining Star

Welcome!!  For my post this week for the Card A Day Blog I've designed a super quick and easy Christmas card.  Our theme this week is 'Christmas Ornaments.'  Just to be very clear, we're not making actual ornaments, although the card could have an element that can be removed and used as an ornament.  We are definitely featuring cards that include ornaments.  It could be an ornament-shaped card or it can be any shape card featuring one or more ornaments in the design, be they stamped, die cut, sticker or whatever.  So, here is my offering:


I was going through my collection of dies looking for my wreaths and ornaments.  That was my original idea.  I came upon this wintery frame, and knew immediately what my card would look like.  The frame has embossed snowflakes in the design as well as the snowflake-looking cuts around the outside.


I decided to use a pearly white cardstock for the frame, and mount it on a navy blue background.  I used a frosty white ink and an opaque white pen to create a snowy look.  The star ornament was cut from a scrap of sparkly holographic wrapping paper which was first glued to cardstock for stability.


I think the embossing on the frame shows up pretty well in the photos, but not so well in the star which is a star within a star.  I used a bright cherry red embroidery floss to attach the ornament to the frame, tied a double bow and then affixed everything with foam tape.  Here are some angled pics to show the dimension.


 I did consider leaving the star free-floating, but I didn't intend for it to be removed so I used the foam tape so keep it stable and show off the bow a bit better.  And that's it!  Really quick.  I haven't done the inside yet, thinking I would wait until I know who will receive the card, but I do believe the greeting will be done directly on the dark card base using white embossing powder.


One of the nice things about this card is that even though there is dimension, it is still very flat for mailing.  The remaining details are few:

           Paper:  Gina K Designs "In the Navy"
           Ink:  Color Box "Frost White" pigment
           Pen:  Inkssentials "Opaque White"

Thanks, as always, for stopping by today.  'Til next time.....

Big HUGS!!
CHRISTINE

Saturday, November 2, 2013

A Christmas Bouquet

Welcome!!  I'm so happy you've come to visit.  As today's designer for the Card A Day Blog I have a fun gift card holder to show you for our theme of Christmas Gift Cards.  I had seen some variations on this card style some time ago, so I knew right away what my design would be.  Now, if you have a good imagination you might see some poinsettias, but if you're like me you'll see a pretty pot filled with lovely Christmas-y red flowers.

Let's start with the empty flower pot.  I wanted my card to fit into a standard A2 sized envelope so I had a bit of figuring to do.  I cut the single sided patterned card stock at 8 1/4" x 4 1/2".  It could have been wider, but I wanted the card to look balanced.  Any wider would just look strange.  I scored at 1 1/8" from either end and right in the center at 4 1/8".  I folded the piece in half, then tapered the two sides, leaving tabs on the front to attach the front and back together.  The two scored ends are folded to the outside creating the rim of the flower pot.  I taped the ends down lightly; then secured them with a pretty red ribbon.  You could also cover the white with different paper as desired.


For the actual card holder, I used a coordinating piece of card cut at 4" x 3 3/4" with the design side to the back, and the top corners rounded.  I used an old gift card to measure for the corners that would hold the new gift card, and made the corners from a scrap of green card.  I used the same green for the die cut leaves and several red scraps to die cut the flowers.


I layered the flowers using liquid glue, then affixed them with thin foam tape.  I added the leaves, some pearls for the centers, and, just for fun, a little white dove.  I was careful when placing the flowers not to let them overlap the top edge too much (needing the keep to the 4 1/4" card size), and to be sure the card went easily into the base.  Here's a photo with the gift card inserted:


You can see the 'flower pot' next to the insert.  Here is a closer look at the flowers:


All you do is insert the gift card and slip that piece into the base 'flower pot'.  A greeting or signature can be written on the card before the gift card is inserted.


So that's it.  You can easily adjust the sizes if you want a bigger bunch of flowers, as well as changing up your papers and colors for any season.  By the way, this was another card created entirely from scraps!  This time I didn't even plan it that way; the right sized pieces just happened to be right where I needed them.

I hope you'll have lots of fun making your gift card holders, and thank you so very much for stopping by today!!

'Til next time.....

Big HUGS!
CHRISTINE


Thursday, October 24, 2013

Warm Wishes

Hi everyone!  Today, at the Card A Day Blog, we are featuring cards for Thanksgiving.  I've been wanting to make a card using a quilt design, so that's what I have for you.  I do have quite a collection of quilting books, but I just searched for a design online. The pieced design is a very common and well-loved star pattern.  My card doesn't have quite the contrast that I would put in an actual quilt, but I'm fairly pleased with the way it turned out.


I used a 4" base of scrap on which to do my piecing.  The pieces are 1" squares, except for the center square, which is 1 3/8".  I used various scraps for my piecing, including a scrap of glitter paper to add just a little sparkle to the quilt.  I inked the edges of all the pieces before assembling.  The centerpiece is a 1" dimensional sticker which says "Happy Thanksgiving."


When it came to mounting the quilted piece, I decided on the rich yellow to set it off.  Before affixing to the card base I added the vertical strip for some extra interest.  Then I finished it off with some white 'stitching'.  Gotta have stichin' on a quilt, ya know!


I found a nice patterned piece to brighten up the inside of the card, much like fabric one would use for a quilt back.  I added some of the 'quilt' squares, and stamped a sentiment.  Here's a closer look:


That's it for my Thanksgiving quilt.  This card was really fairly easy to pull together.  I used four papers (because of the size of the scraps I was using), but you could use as few as two colors for the block design.  So, what are you waiting for?  Do a search for quilt block designs, pick one out, and make a pretty quilt-style card for your next occasion!


Thanks so much for stopping by today!  Here are some details:

     Papers:  K and Company, Stampin' Up, DCWV
     Inks:  Memento 'Desert Sand' and 'Potter's Clay'
     Sticker:  Recollections
     Stamp:  Inkadinkado 'Harvest Inchie Bundle'
     Misc:  Inkssentials white opaque pen, Scotch ATG and Quick-Drying Tacky Glue. foam tape

'Til next time...

Big HUGS!!
CHRISTINE

Friday, October 18, 2013

Vrolijk Kersfeest!

"Christmas Around the World" is the theme this week over at the CARD A DAY BLOG, and I wonder if you can guess, by the title of my post, just where in the world is being highlighted by my card.  Well, it's really quite simple.  I haven't made an iris fold design in quite awhile, so I wanted to make my card using iris folding.  I didn't remember where iris folding had its origins, and decided to do a little research before starting my project.  It turns out that the technique of iris folding began in the 1700s in Holland, so that gave me my inspiration country.

The Dutch celebrate Christmas in much the same way as we do in the U.S., but they have separate celebration days for gift-giving and for the religious ceremonies and church-going.  Here is a brief description from Love to Know--Christmas:


"In the Netherlands, holiday traditions include Sinterklaas Avond, the midwinter hoornblaazen, and special celebrations on Christmas Day.

Sinterklaas Avond

Sinterklaas Avond - St. Nicholas Eve - is celebrated annually on December 5 and is considered the eve of Santa Claus's birthday. On this eve, Sinterklaas journeys to the homes of every child in the Netherlands and leaves small gifts and treats for them to enjoy. Sinterklaas is the Dutch equivalent of Santa Claus, but he looks quite different from the jolly man depicted in western culture. Sinterklaas is tall and slender, and he wears dark red robes and a hat similar to a bishop's attire. In many traditional images, he is elderly and has a long white beard.
Sinterklaas Avond celebrations actually begin several weeks before December 5, often as early as mid-November. Sinterklass is believed to live in Spain, and he arrives with great fanfare on a steamship at the start of the holiday season. Amsterdam and other port cities generally hold great celebrations to herald his arrival, including parades, ringing church bells, and children's parties.

Sinterklaas is accompanied by his assistant Black Peter (Zwarte Piet), who is dressed in 16th century Spanish attire to symbolize Spain's dominance over the Netherlands during that era. But Black Peter's face is covered with soot and he rides a mule, a stark contrast to the more joyous colors of Sinterklaas's red robes and white horse. It is Black Peter who goes down each home's chimney to leave gifts for the children, though in some legends he is also said to punish disobedient children.
Just as children in western cultures leave cookies for Santa Claus and may leave a treat for his reindeer, children in the Netherlands leave their shoes filled with hay, carrots, and sugar for Sinterklaas's horse. In the morning, the horse treats have been replaced with gifts for the children.

Midwinter Hoornblazen

Rural eastern areas of the country celebrate different Christmas traditions in the Netherlands. In addition to Sinterklaas Avond celebrations, this area is well known for the midwinter hoornblazen, or midwinter horn blowing. Handmade horns - three- or four-foot horns carved from birch or elder saplings - are blown over wells to announce Advent and herald the birth of Christ. The low tone produced from these horns resonating over the wells can be heard for several miles, and it is not unusual for several farms to seemingly call to one another with their horns. In some areas these horns may be blown each day of Advent, or they may be reserved for the first or last days of the spiritual celebration.

Christmas Day

December 25 is still a holiday in the Netherlands, but since most gift-giving is done on Sinterklaas Avond, this later part of the holiday season is generally more spiritual and involves more church services, concerts, and recitals showcasing religious material. This day is a time for family gatherings and delicious meals, including special breakfasts and formal dinners.

Christmas decorations in the Netherlands include rustic Christmas décor such as pine and holly boughs, simple lights, and candles. Many homes do have Christmas trees, and they may be decorated with all types of lights and ornaments or they may be simpler than western holiday decorations. Themed trees are especially popular. Another popular decoration is poinsettias (kerststers), which are often used as centerpieces, accents, and other holiday décor."


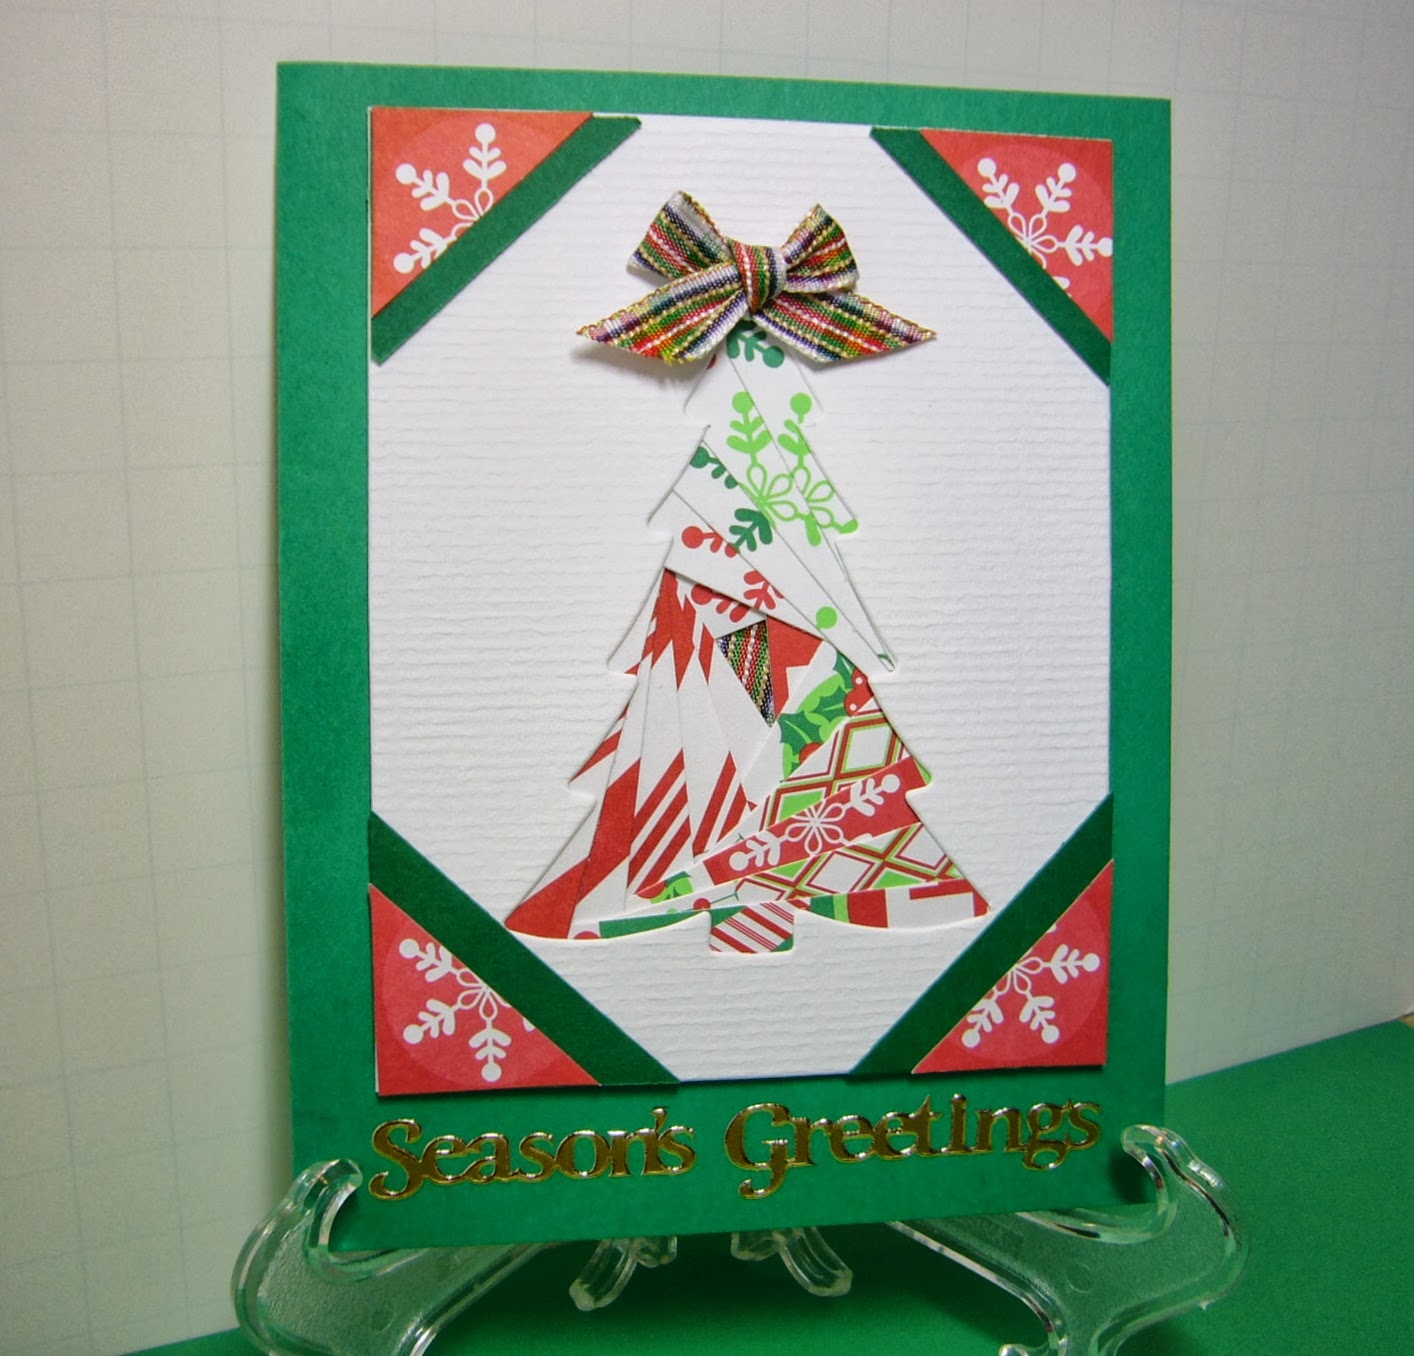
Well, now you know almost everything about Christmas in Holland (The Netherlands).  Since their tradition includes Christmas trees, I decided that my iris fold design would be in the form of a tree.  So without further delay, here is my card:

 
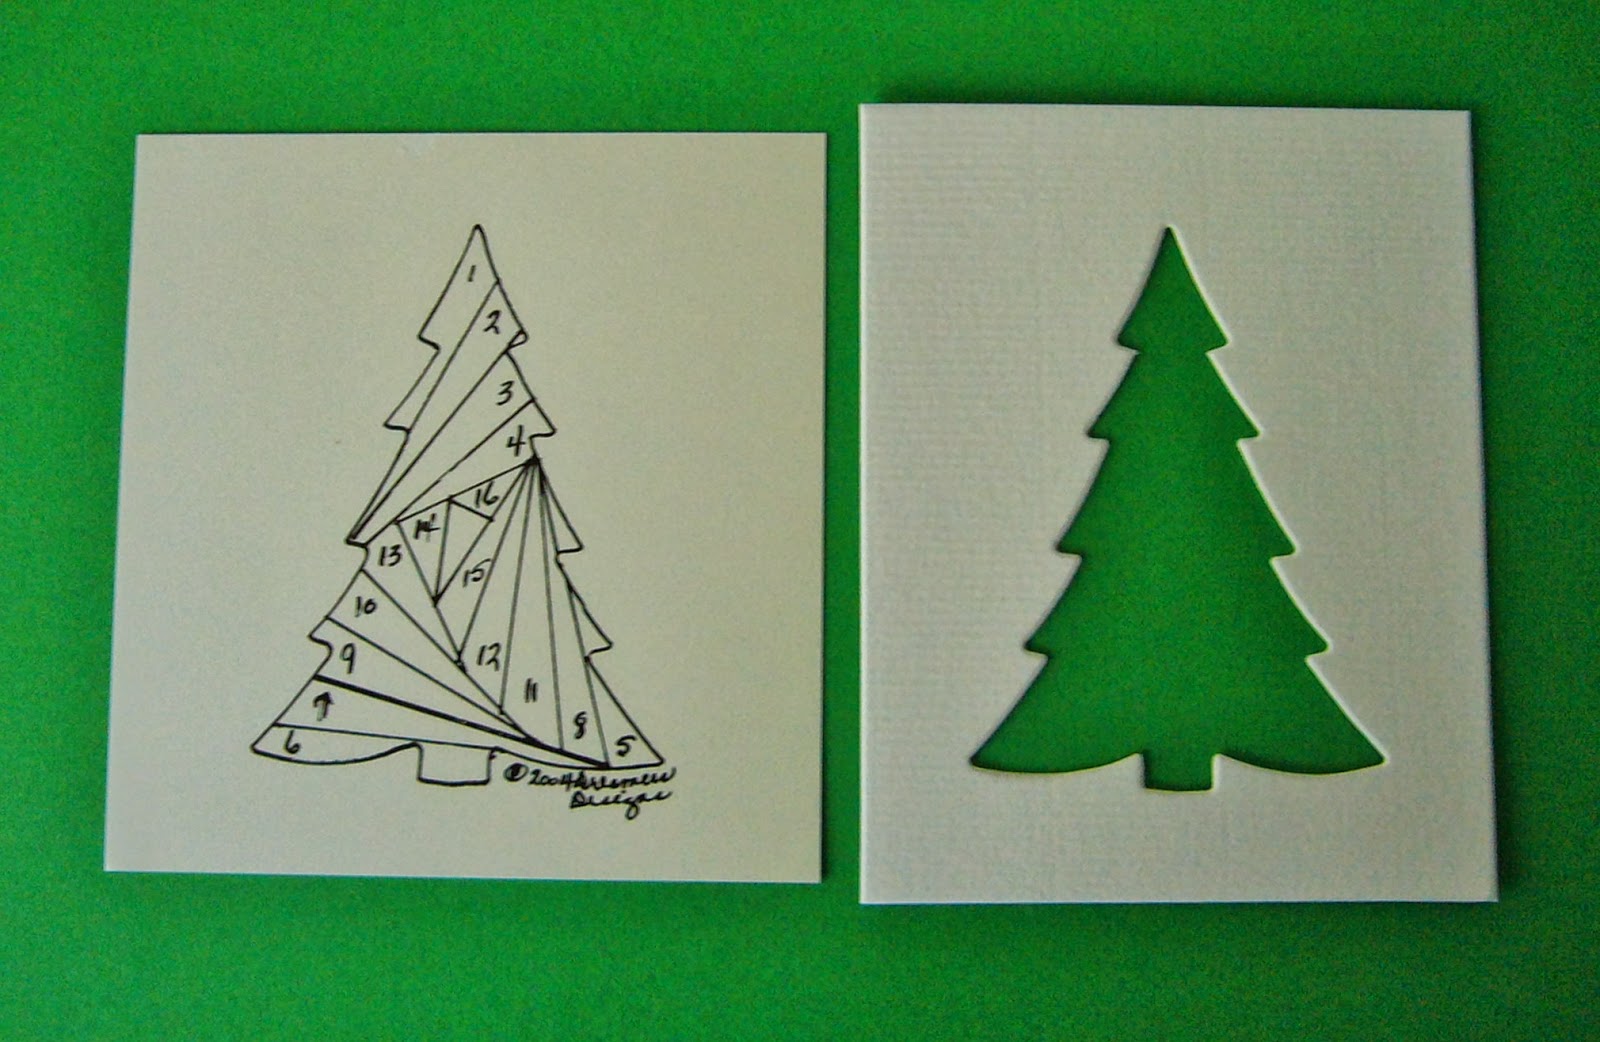
For anyone not familiar with the iris folding technique; it starts with a pattern (usually numbered) which indicates the placement of folded bits of paper to form a design.  The design has been cut from a piece of card, and the folded bits are taped or glued to the back of the design.  The "iris" appears when the card is turned to the front.  Here is a photo of my pattern and the cut design: 


When I was looking for my iris pattern among my Christmas supplies, I came upon a single card kit packet that I had gotten at a trade show or maybe in a class.  So I decided to use the kit as my base, and I pulled papers to coordinate.


I used three scraps to cut the strips for the iris design.  The piece of ribbon came in the kit, so I tied the small bow for the top of the tree, and used a scrap of the ribbon for the iris center.

The faux photo corners were cut from another piece from the kit (green) and bits from one of the papers used for the strips, and layered.  The sentiment came from a sticker pack.


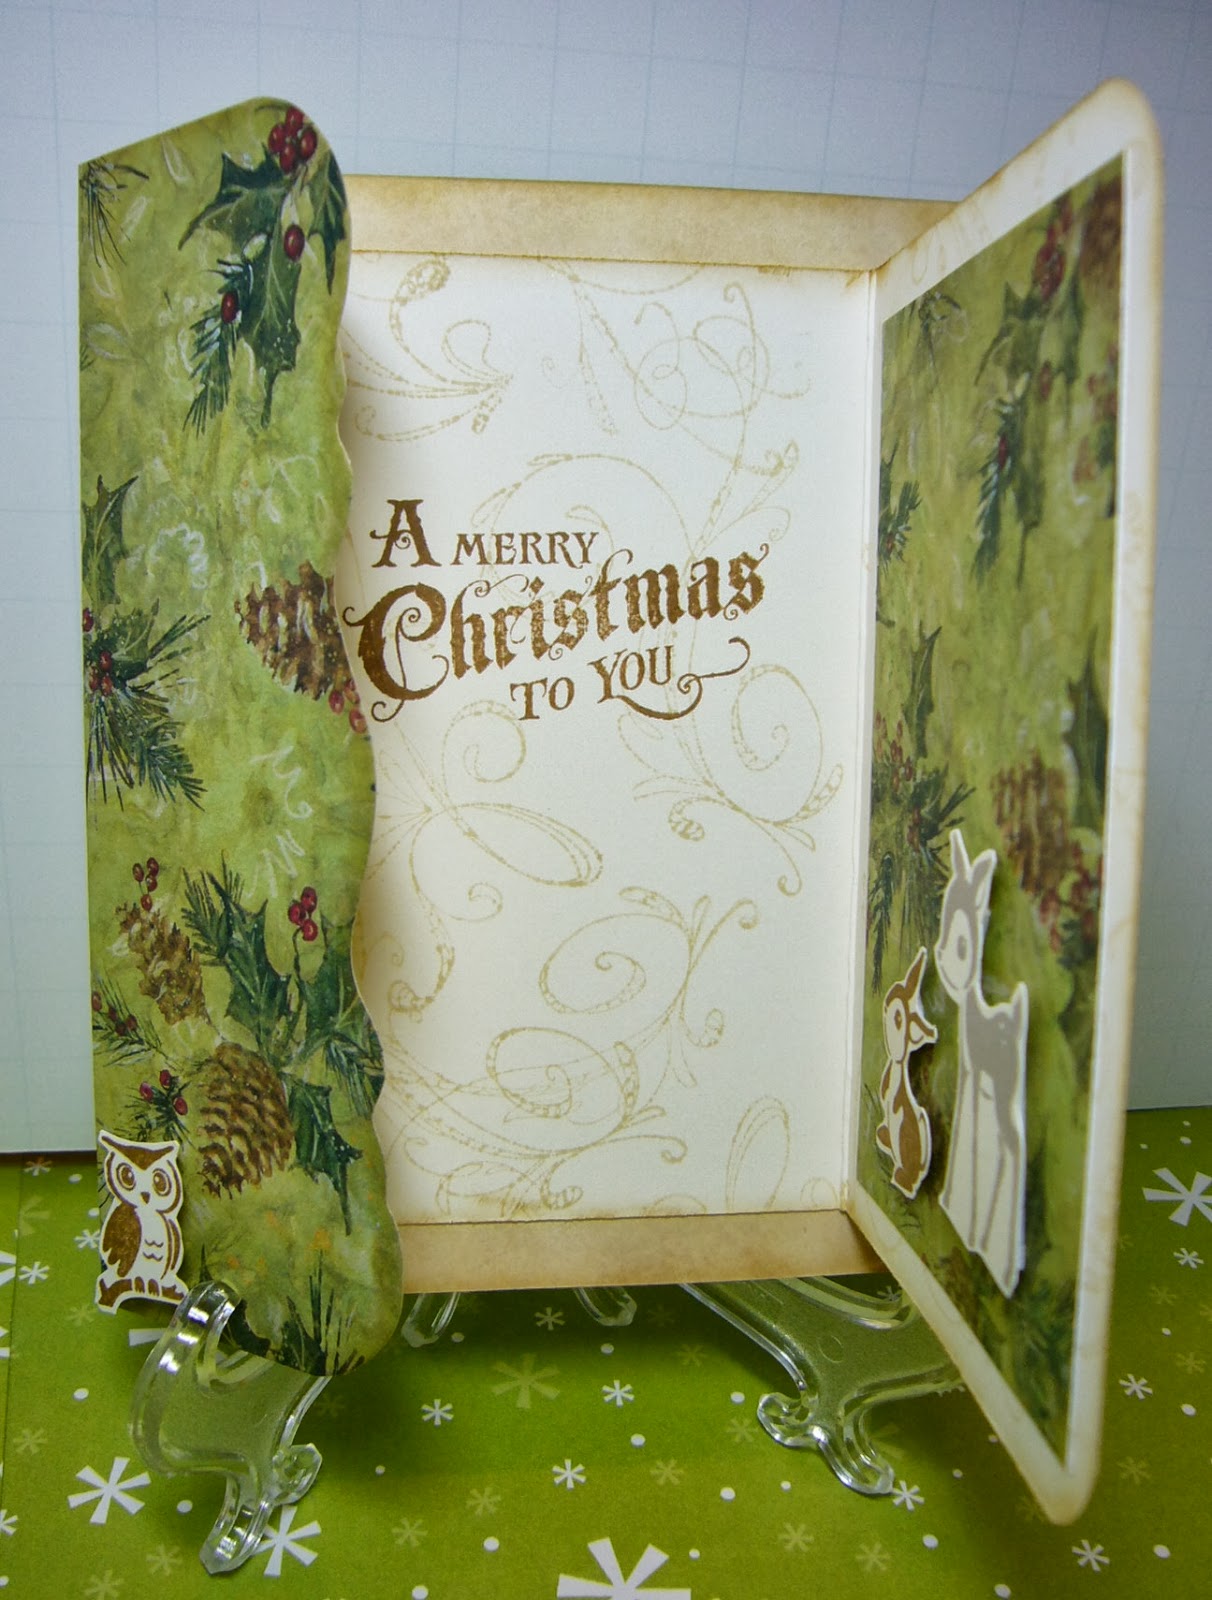
Then the inside needed some color.  I used another of the scraps from the tree as a mat, stamped and embossed the greeting on a piece of white card and layered them.


Now, if you haven't already guessed the translation of my title, of course it's "Merry Christmas."  I don't personally know anyone who speaks Dutch, so I elected to use English on my card. 

Here are the supplies I can tell you about:
     Paper:  design scraps from Recollections
     Sticker:  Dazzles from Hot Off the Press
     Stamp:  Gina K Designs "Very Merry Christmas" set by Theresa Momber
     Embossing Ink and Powder:  Versamark ink, Stampendous "Detail Gold"

I used therm-o-web Sticky Dots to affix the bow and foam tape to adhere the centerpiece to the card front.


Thanks so much, as always, for visiting with me today.  I hope you've enjoyed your brief visit to Holland to learn just a bit about their Christmas traditions!

So 'til next time.....

Big HUGS!!
CHRISTINE

Monday, October 7, 2013

Christmas Joy - Fold

Happy Monday!! (Or whatever day it is that you're seeing this.) I'm here with you today with my second Christmas card of the year.  This week at the Card A Day Blog we are using the inspiration of "Christmas and Animals."  I decided to use another fancy fold for my card, known as a 'joy-fold.'  I couldn't find anything to explain where the name originated, but it's a nice design.  There are lots of videos on YouTube showing how to make this style of card.  So I won't go into too much detail, but I think my photos will show you how easy this design is to make.  Then you can check out some of the videos for variations.

I wanted my card to fit the standard A2 sized envelope.  In this case I started with a card base cut at 5 1/2" x 6 1/4."  My paper was from a card stack with die cut edges and printed on both sides.  This was important because both sides of the paper will show.  The 5 1/2" measurement would be the height of my card.  I scored at 2" from the die cut edge to make the card width 4 1/4."  Okay, here is a photo:

 
 I needed a second piece of card stock, and used a plain off-white on which I stamped a swirl background.  This piece was cut at 4 3/4" high x 6 1/2" wide and scored at 3 1/4" along the width.  Next I prepared the animals and the tree.  I stamped the three animals on the same off-white card, and cut them out by hand.  Then I used my Cuttlebug to die cut the tree using the design card.  I used a fine point glue pen to affix the tree and added some sparkle with a glitter pen. You can see the glitter in some of the photos, especially if you click on them to enlarge.


The tree was added to the front of the smaller card, and a piece of the design card was layered on the inside.  I also stamped the sentiment on the inside before affixing the two card pieces together.
 
 
Before assembling the card I inked the edges of both pieces and rounded the corners of the smaller piece to coordinate with the die cut edge.  You can see the way the two pieces are layered in the next two pictures.  The fold of the base is to the left, while the fold of the liner with the greeting is to the right.


When the card is closed the left flap is closed first, with the right side closing over the left.  The card is held in the closed position by the sweet little owl who stands guard by the tree.  The owl is affixed with two layers of foam tape.  The bunny and the deer on the inside are affixed with a single layer of the foam tape.
 I hope you've enjoyed my card today.  Here is a final photo and then your details:
 
 
Supplies:
          Papers:  K & Company "Glad Tidings" by Susan Winget, Stampin' Up "Very Vanilla"
          Inks:  Ranger Distress Inks in "Antique Linen," "Vintage Photo" and "Pumice Stone"
          Stamps:  Inkadinkadoo "Sketchy Flourishes" and "Warm Holiday Wishes," Stampin' Up "Forest Friends" and WaltzingMouse Stamps "Complements of the Season"
          Die:  Memory Box "Snowflake Tree"
          Misc:  Zig 2-Way Glue fine point, Scotch ATG, Sakura "Clear Star" glitter pen, Crop-a-Dile Corner Chomper
 
Thank you so much for taking time out of your day to visit.  I hope you have a wonderful week!!
 
'Til next time.....
 
Big HUGS!!
CHRISTINE

Thursday, October 3, 2013

Mash-Up for Christmas

Well, it's that time again.....starting those Christmas and other cards for the season.  I'm up on the Card A Day Blog today, and we're starting our Christmas card inspirations.  Of course, we don't stop with Christmas.  We include pretty much all the holidays of the season.  So be sure to visit regularly if you're looking for ideas for your cards.

I called my card a "mash-up" because that's really what it is.  I pulled together an assortment of scraps and bits of ribbon and extra pieces from earlier projects to make this one.  It's not the card I thought I was going to make, but I'll do that one another day.  For now, here is today's card:


I was inspired to make this card while I was straightening up some of my supplies, and my eyes stopped on some rosettes that were still laying about instead of being put away a long time ago.  So I chose the rosette that I wanted along with a topper snowflake and paired it with a strip leftover from cutting all the rosettes.  The rosette and snowflake had already been coated with gold glitter spray which helped me decide the rest of my color scheme.


I tore a page out of an old book that I use for projects, crumpled it, stamped it with snowflakes that I embossed with gold powder and rubbed on some metallic gold paste to bring out the distressing.  I used the same gold paste on a piece of textured packing paper, and layered both pieces on the card base.


I layered two pieces of ribbon with the patterned paper scrap.  Then added that piece to the card after affixing the hand made paper sentiment strip.  I also added two leftover bits of the gold ribbon as embellishment to the rosette.


I needed to bring some of the design to the inside, so I used another piece of the torn-out book page, crumpled it and stamped and embossed some of the snowflakes as well as the greeting.


The last step was rounding just one corner of my card.  And that's it!  As I said, I had lots of fun putting this one together.  Sometimes it's good just to let go and play.  You just never know what you might come up with.


Supplies:
     Stamps:  Stampin 'Up "Snow Swirled" and "A Christmas Carol" sets; WaltzingMouse Stamps "Complements of the Season" set
     Inks:  Versamark and Craf-T Products Metallic Rub-Ons "Gold"
     Embossing Powder:  Stampendous "Detail Gold"
     Extras:  Aleene's Fast Grab Tacky Glue, Scotch ATG, Crop-A-Dile Corner Chomper

Thank you so very much for visiting today.  Your visits make me happy, and I welcome and appreciate your comments as well.  Feel free to leave questions in the comment section. too.

'Til next time.....

Big HUGS!
CHRISTINE