Followers

Showing posts with label Copics. Show all posts

Thursday, September 26, 2013

Fancy Fold Halloween Card

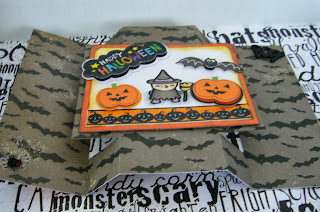
Hi everyone!  It's Halloween time over at the Card A Day Blog, and I have a cute fancy-fold card to show you.  My inspiration for this card came from Splitcoaststampers, but I have modified it slightly and changed the sizing.  I'll give you a look first, then go into the details.


I wanted my card to fit the standard A2 sized envelope, so I started with a card base cut at 5 1/2" x 8 1/2".  This card is actually a modified tri-shutter style, but with the different cuts and folds it features a centerpiece.  Here are the measurements:  make a cut 2 1/8" from each short side starting at 1" from the top and ending 1" from the bottom.  Turn the card and cut 1 1/16" starting at the previous cut and going in toward the center of the card.  Do this on all four corners. 
 
 
This photo of the back of my card should give you an idea of what you will have when you fold.  It works best to score your card (top and bottom) at the 2 1/8 and 3 3/16 points.  The 2 1/8 scores will make 'valley folds' and the 3 3/16 scores will make 'mountain folds.'This will give you the centerpiece of your card which should now measure 3 1/2" x 4 1/4".


In the sample I saw on SCS, the designer cut out two rectangles and then added a centerpiece.  I elected to simply cut around three sides and leave the center intact.

Next I built the centerpiece using an orange dp as a mat and a piece of white cardstock for my background.


I stamped and colored the little witch, the bottom border is a rub-on, and all the rest are stickers.  I used my 1/4" corner rounder for the top of the two layers and did some ink distressing around the edges.


You can see in the previous three photos that the stickers, themselves, are multi-layered.  Also, they are affixed with foam tape as is the full front piece.

This card can stand alone very nicely, as you will see in the next photo, or use an easel to feature it as I did in most of my photos.


I hope you've enjoyed my fun little card.  It was actually fairly quick to make; especially since I used ready made embellishments.  If you have questions, please leave them in the comments with a way to contact you.  I will answer as quickly as I can.

Here are some details for you:
     Paper:  Making Memories "Spook Alley" pack-card base
     Stamp:  Pink By Design "Guess Who" set
     Inks:  Ranger Distress "Spiced Marmalade" and "Black Soot" and Versamark
     Embossing Powder:  Stampendous "Detail Black"
     Embellishments:  Recollections Layered Accents and Rub-On, Jolee's boutique Spider, Recollections BOO!

Thanks for visiting!  'Til next time...

Big HUGS!
CHRISTINE

Wednesday, August 14, 2013

It'll Be Okay

Happy mid-week everyone!  I'm designer of the day over at the CARD A DAY BLOG.  This is a week of using some kind of embossing but without a specific theme.  So, I have a little rainy day card for you using both wet and dry embossing.  It's a cute little card, and really quite easy to make.

I decided to start with an embossing folder, and build my card around whatever design I chose.  In this case, I chose a cloud folder.  I knew I had at least one stamp that was handy that I could use with clouds for a background.  I used my Cuttlebug to emboss a piece of vellum with the clouds, and then picked a dark blue mat to give an overall look of a very gray day.  Just to keep things a bit neutral, I chose kraft card for my base.


I stamped my focal image and my sentiment on white with Versamark ink and embossed with black powder.  The embossing gave a nice outline to color in, which I did very simply using Copics in cheery colors.  I also gave the sentiment a bit of shading with the same blue Copic marker.


I then die cut the two pieces using a slightly fancy die for the label and a die that complemented the look of the clouds for the image.


Not wanting any glue or tape to show behind the vellum I simply used brads to affix the label and vellum to the mat.  I then used foam tape to affix the image piece to the vellum as well as the mat onto the base.


In all this was a relatively quick card to put together.  I got a slightly late start on creating, so quick was a good thing for me today. (heehee)

As always, thanks so much for coming by.  I do hope you enjoyed your visit!

Here are just a few details:
     Paper:  Gina K Designs "In the Navy"
     Brads:  Bo Bunny "Bodacious Brads" in Buttercup
     Embossing Powder:  Stampendous  "Detail Black"
     Stamps:  Pure Innocence for My Favorite Things "My Umbrella"
     Dies:  Spellbinders and Lifestyle Crafts
     Embossing Folder:  Darice "Clouds"
     Markers:  Copics Y04 (Acacia), B24 (Sky), E00 (Skin White), R11 (Pale Cherry Pink)

That's it for now --- see you again soon!!

Big HUGS!
CHRISTINE

Tuesday, June 18, 2013

It's an Inspiration!

Well, hello again!  I'm trying to get caught up with our challenges over at the Crafter's Digital Arts Center.  We have just under two weeks left on our current challenges; they are all ending on June 30.  If you love working with digital art you should come on over and check us out.  The challenge I have designed my current card for is the "Inspiration" Challenge.  Thus, the title of my post.  I used a pretty image from Tiffany Doodles to design my card around.  Here is the inspiration from the challenge:


I used my usual A2 sized base for the card.  I chose three coordinating dps, and created my own sentiment for both outside and inside.
 
 
Once I determined where I wanted to position each dp, I did all the cutting.  This included cutting a backing piece to frame the image.
 
 
I lightly colored the image with Copics, and mounted it to its backing.  I diecut the outside sentiment, and colored the outer portion of the tag as well.  Two matching brads attached the tag to the background.  I used foam tape to affix the image piece.
 
 
To finish my card I simply printed the inside sentiment onto white card to give a light space for a handwritten message and signature.
 
 
This card would have been fairly quick to put together, but I tend to get picky sometimes which causes many of my projects to take much longer to make than they should.  (hehe)  Anyway, I'm pleased with how my card turned out; I think I did a pretty good job using the inspiration colors. What do YOU think?
 
See you again as soon as I can!!!
 
Big HUGS!
CHRISTINE

Saturday, June 8, 2013

Hi!

Hey there, folks!  Well, I don't usually do more than one post during a given theme for the Card A Day Blog, but this week is an exception.  I have a second inspiration for you during this 'friendship' week that I hope you will enjoy.  Once again, except for the card base, all my pieces were leftovers/scraps.  Even my central image, a wonderful digital design by Guy Gondron for an internet class I took awhile back on coloring with Copics, was a leftover image just waiting for the right project.  So, since I have used a digi design on this card, I am entering it into the Seasonal Fun Challenge (must use a digital design) at CDAC.  I haven't mentioned this before, but I've been having a real issue with arthritis in my right hand so that I am scarcely able to write, let alone color, for any extended time.  Fortunately, I had colored this image at the time of the class, and here is my card!


When I was browsing through a collection of images I had previously printed out (or even colored), I came upon this cute turtle.  I couldn't help thinking first, how cute he looks peering up at that little ladybug flying by his head, and second, how much he reminded me of a turtle my hubby encountered in our yard one day and brought into the house for us to see.  Of course, we immediately named him;  Bartholomew T. Turtle.  I decided to use a kraft card base to mimic sand, and put Bartholomew in a little grassy area right by the sand.  For the grass I used two different dies (One from Impression-Obsession and the other, I think, from Lifestyle Crafts) to cut my green scraps.  Here is a close shot of the coloring and the grass:


Since I didn't want Bartholomew to look lonely on the card, I decided to put a nice frame around him.  I actually used a test cut that I had saved from an earlier project.  When choosing the colors for the frame, I wanted to highlight the color of the little ladybug.  I used Tim Holtz Distress Inks in "Spiced Marmalade" and "Ripe Persimmon" to add the color to the frame.  Also, I wanted to have some dimension on the card, so I layered the grasses and the frame with foam tape.  Here is an angled pic for you which shows the dimension:


Finally, I stamped the simple greeting, and left the inside blank so there is lots of room to write a nice message to a favorite friend.  The stamp came from a set called "Happy Messages" by Stampendous, and was stamped with Versamark "Onyx Black."

If you have some friends you haven't seen or spoken with for awhile, why not put together a few cute cards and write them a 'happy message?'  Everyone loves to open their mailbox to find a lovely greeting card waiting to be enjoyed.

Thanks so much for stopping by today.  I hope you're enjoying a wonderful weekend!!

Big HUGS!
CHRISTINE

Friday, August 17, 2012

One of My Favorite Cards

Hello, out there!  I have another card for you today which is posted in the Card A Day Blog for this weeks' theme, "Cheer Up."  This is certainly one of, if not my most favorite card that I've made.  I actually made it some time ago, but never got around to posting it for you.  It really is a quick and easy card to put together.  Probably the most time-consuming part of the card, aside from choosing the design paper, is the coloring.  And even THAT is done quickly once you have the colors chosen.

I made this card while at visiting my DS (sister, that is), and, since I was using many of her supplies, have no record of most of what I used.  I did start out with a standard A2 sized card base (4 1/4" x 5 1/2") in a lovely linen textured card stock.  I spotted a beautiful piece in DS's scrap box that I thought would make the perfect backdrop for my pretty lady stamp.  Then, all I needed was a sentiment.


The colors to use for the stamp were easily chosen to match the colors in the floral background paper.  The image was stamped on a nice smooth white piece of card, colored with Copics, and the white was toned down by gently inking around the image leaving a plain white border.  That piece was then matted to a piece of blue card cut just a bit larger.  The pearls were added for an extra touch of class.  Memory fails as to whether the pearls just happened to be the right color or I used the same blue Copic marker as in the image, but I think it was the former.


The sentiment was stamped in black on the same blue card as the mat, and then die cut and inked lightly with the blue as used on the lady piece.


And here are the two stamped pieces together:


As you can see, the dp is cut on the diagonal to cover just half of the card front, leaving a tiny white border at the top and left side.  The card was given some dimension by mounting the lady to the card with foam squares and the sentiment with a thinner foam tape.


Who knows, perhaps I will allow myself to use this card one day.....................

The image stamp is from Sweet Stamps; 1900's Lady, #513F.

Hope this card was able to cheer you.  Do remember to keep your creative genius happy and well-fed!

Hugs to all!
CHRISTINE

Monday, April 9, 2012

Here's to Grandmom

Hi everyone!  I do hope you and your family enjoyed a beautiful Easter celebration.  Our Easter service was so joyful, and filled with glorious music.  I'm here, today, to bring you a Mother's Day inspiration for the Card A Day Blog.  I really enjoyed making this card, using images from one of the Crafter's Digital Art Center Progressive Challenges.  The girl in the image reminds me of my daughter, so I decided to make this card for her to give to her grandmother.  Here's the first peek:


The girl is a digi image from Back To Paper.  I colored her with copics, and paper-pieced her dress using a matching blue marker to color the trim.  The flowers are another digi, this time from Glitterbabe.  I printed the flower in the yellow paper in three sizes and cut them out for dimension.  The stems are just cut from a scrap.

The card stock I used is a nice weight, and I wasn't expecting the color to bleed through, but it did!  Since I needed to cover the bleed on the inside, I printed the sentiment directly onto a matching blue card stock and used it as a liner.


And a closer view so you can see the fonts used:


Of course, I had to get daughter's approval every step of the way.  She chose the outside sentiment, which comes from Sarah Hamer of 'My Pink Cricut.'  Here is the full front view:


As you can see, I rounded the corners.  I cut the liner just a bit smaller and rounded those corners to match.  And of course Grandmom needs a little bling, so rhinestones were added to the flowers.

I hope you enjoyed your visit today!  Think about joining the CADB challenges.  Please do remember to keep your creative genius happy and well-fed!!

CHRISTINE

Monday, February 13, 2012

The Wearin' o' the Green

Top o' the mornin' lovely ones!!  (or afternoon or evening or whenever you're catching this)  I'm the designated designer today over at the Card A Day Blog, and we're celebrating a week of St. Patrick's Day greetings.  So go get your green goodies and some shamrocks, and come join in our celebration.  It might just be your lucky card that wins our challenge this month!

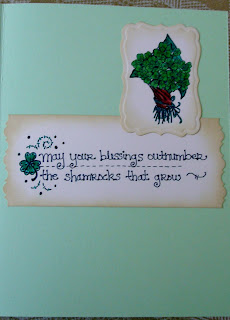
Now for my card.  I've been wanting to use some of the great digi designs I've been accumulating, and I knew there had to be something appropriate for the theme this week.  After a bit of searching, I found the perfect designs; I hope you'll agree.  The design is fairly simple, but I think it comes across with great effect.

I didn't want to reduce the size of my central image too much, so I decided on a base size of 6" X 4 1/2".  The image would have a double frame, and then a greeting banner would be added.  Here are the first photos:


I printed the image (yes, it was already colored), and designed my own greeting.  I chose a font that closely resembled the sentiment digi I would be using on the inside.  I also chose a digi image of a bunch of shamrocks for the inside of the card.


Here's a closer shot.  I did the coloring on these myself.  I used Distress Inks for these images as well as the front frames.


Finally, here is the pic of the full front of my card.  I used foam tape to mount the frame and the greeting.


Now for the little details:
     Card Stock:  Recollections (for base and inner frame), Stampin' Up Very Vanilla (for all printed images)
     Design Paper:  K&Company
     Ink:  Tim Holtz Distress Ink by Ranger (Antique Linen and Bundled Sage)
     Digi Images:  Front image from Paper Crafting World, Inside sentiment by Meljen's Designs, Shamrock Bunch from Waltzingmouse Stamps
     Dies:  Spellbinders Labels Seventeen
     Markers:  Copic, Micron Pigma
     Misc:  Fiskars Paper Edgers - Victorian

Time to shake the green and get back to the red to wish you a very

Happy Valentine's Day!!!

With lots of hugs,
CHRISTINE
Saturday, November 5, 2011

Home Sweet Home for Christmas

Happy Birthday to me.....Happy Birthday to me!!!!  Hi everyone!  Yes, today is my birthday so I thought I'd send myself some wishes.  LOL

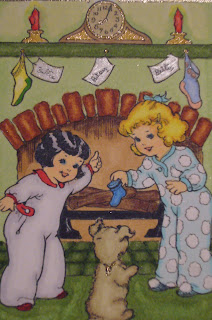
Welcome!!  As today's designer for the Card A Day Blog I have a very traditional card for you.  Our theme, this week, is 'Christmas at Home,' and all the designers have shared a little bit of their own memories of Christmas.  I chose an adorable image from Nicecrane Designs (no affiliation).  This design was so much fun to color.  I just love the vintage look, and the simplicity of the card itself.  Once the coloring is done, the card takes just a few minutes to complete.

I used mostly Copics to do the coloring, but there was also a Sharpie, a Sakura glitter, an Inkssentials Opaque White and an unidentified silver metallic pen.


I'm not totally certain, but this may be the first time I added no extra embellishments to a card.  It just seemed that the colored image was really all that was needed.  Here are two close-ups:


I'm glad you can see the glitter in the photos; sometimes it doesn't show up too well.  But I think it adds the right touch to this easy to make card.  I created the sentiment on my computer, printed it in a matching green color, cut it out and added the glitter with the Sakura pen.

The inside greeting comes from Waltzingmouse Stamps set, Complements of the Season.  I stamped it using Ancient Page Pine.  I thought it was a perfect match to the outside image.


The nice thing about using digital images is that you can make them any size.  In this case, I made the image 4 1/4" x 3" to fit an A2 card base (Stampin' Up Garden Green), leaving room for the sentiment.  You can use any coloring method that you like.  I used the markers, but you could use pencil, chalk, paint or even color it digitally.  Here is the full front view of my card.  I hope you like it!


Thanks for coming by to visit.  See you again soon!!


Keep your creative genius flowing.........

CHRISTINE

Friday, October 14, 2011

A Beary Cute Halloween

I just love being part of the CRAFTERS DIGITAL ARTS CENTER where so many digital artists come together to share their designs and ideas.  My card today is for the CDAC Progressive Challenge #4.  The theme for this challenge is Halloween or Mystical, and the digi art I chose to use comes from Sew Many Cards Digital Stamps.  I couldn't resist such a cute design.  Here it is after coloring:

I used Copics and Bic Mark-Its for the coloring---lots of them as you can see here:


The card base is white Wausau Vellum in standard A2 size.  I used black Recollections card stock for the mat, and ran it through my Cuttlebug in a Sizzix for Stampin' Up Spider Web Textured Impressions folder.  I gave the spider web a hint of color and glitter with studio g silver chalk ink.

I used the out-of-the-box technique (you'll find lots of tutorials if you do a quick search) to cut and frame the image, and used foam tape to mount it on a piece of Papertrey Ink Bitty Dot Basics paper with the corners cut using a Tonic corner punch.  The image and the card base were lightly inked with Martha Stewart by EK Success Curry ink.

For the finishing touches I used a dimensional sticker for the greeting (K&Company) and added a funny little spider (EK Success Jolee's Boutique).


On the inside I added another dimensional sticker mounted on the same dotted paper:


Well, I hope you enjoyed this cute little Halloween creation.  I loved working with adorable little Bailey Bear and his jack o'lantern candy bowl.


Have a wonderful day, and always keep your creative genius flowing!!

CHRISTINE

Monday, October 3, 2011

Angel Watching Over You

I certainly had a great time blog hopping this weekend with all the World Cardmaking Day hops going on.  At Card A Day Blog we're continuing our 2 1/2 month-long Christmas card extravaganza that was started with our weekend hop.  If you haven't been there yet, check it out.  I am one of several designers who will be bringing you Christmas card inspirations through the next eleven weeks, so get your supplies ready and make some cards with us.

Today is one of my days at CADB, and the card I have for you was actually my daughter's idea.  I threw out the question, "What should I do for this card?"  She was already aware of many of the themes we have coming up, and since this is an 'anything' Christmas week she suggested an angel.  What an excellent suggestion; I love angels!  (I think she was looking in the mirror when she made the suggestion.  She is definitely MY angel!)

I went in search of my angel stamps -- yes, I have several -- and chose, with daughter's help, a lovely set from Stampin'UP.


I stamped my angel with Ancient Page Coal Black dye ink and colored her with Copic markers.  Her halo and wings were colored with an EK Success metallic gold pen.  She was then mounted with foam tape onto a die cut.

The sentiment is another die cut piece, and is adorned with dimensional stickers (not sure where these came from--don't have the packaging--maybe K&Company??).


I was using a red card base, so I thought it best to have a lighter paper matted on the inside for the sentiment and signature.  I used the same design paper inside as I used outside.


The same die-cut set is used for the inside sentiment (layered) as for the angel.  All the papers were inked before assembling.  As you can see, I also rounded all the corners.

Here's the full view:


And now for the details:

     Papers:  Papertrey Ink Pure Poppy, K&Company Yultide design paper pack, Stampin'UP Very Vanilla
     Inks:  Ancient Page Dye Inkpad in Coal Black, Tim Holtz Distress Ink in Antique Linen
     Stamps:  Stampin'UP Angelic Joy set
     Dies:  Spellbinders Nestabilities Labels Four and Shapeabilities Grommet Tags
     Misc:  Crop-A-Dile Corner Chomper, Scotch tape runner, Cuttlebug

See you again soon, my lovelies.....leave a comment if you can!  :)


Do remember to keep your creative genius flowing.........


CHRISTINE