Followers

Showing posts with label Cuttlebug. Show all posts

Wednesday, May 14, 2014

Happy Anniversary

Hi!  My card for today was a special request from my church choir to be given to our pastor who is soon to celebrate his 40th anniversary in the priesthood.  I think it is a very classy masculine card, whose focal point can be changed to suit many occasions.  This card also fits in with our Card A Day Blog theme of 'Use a Sketch.'

I went a little out of my comfort zone with this one by using a 5" x 5" card base rather than my more typical A2 size.  After choosing a sketch, I decided the square shape would be the better choice.  Here is my chosen sketch from Card Positioning Systems:


I wanted a religious image for my card, so I chose a Spellbinders Cross die and cut my focal image from a scrap of a really pretty textured slightly silvery paper.  The paper has a very subtle embossed design.  The same paper was used for the cross strips in the layering.


As soon as I chose the sketch I knew what my embellishments would be, 'Designer Brads' from the Paper Studio.

The card base, as well as two of the smaller layers, was cut from Stampin' Up 'Very Vanilla" stock, and the black layering pieces came from Recollections.


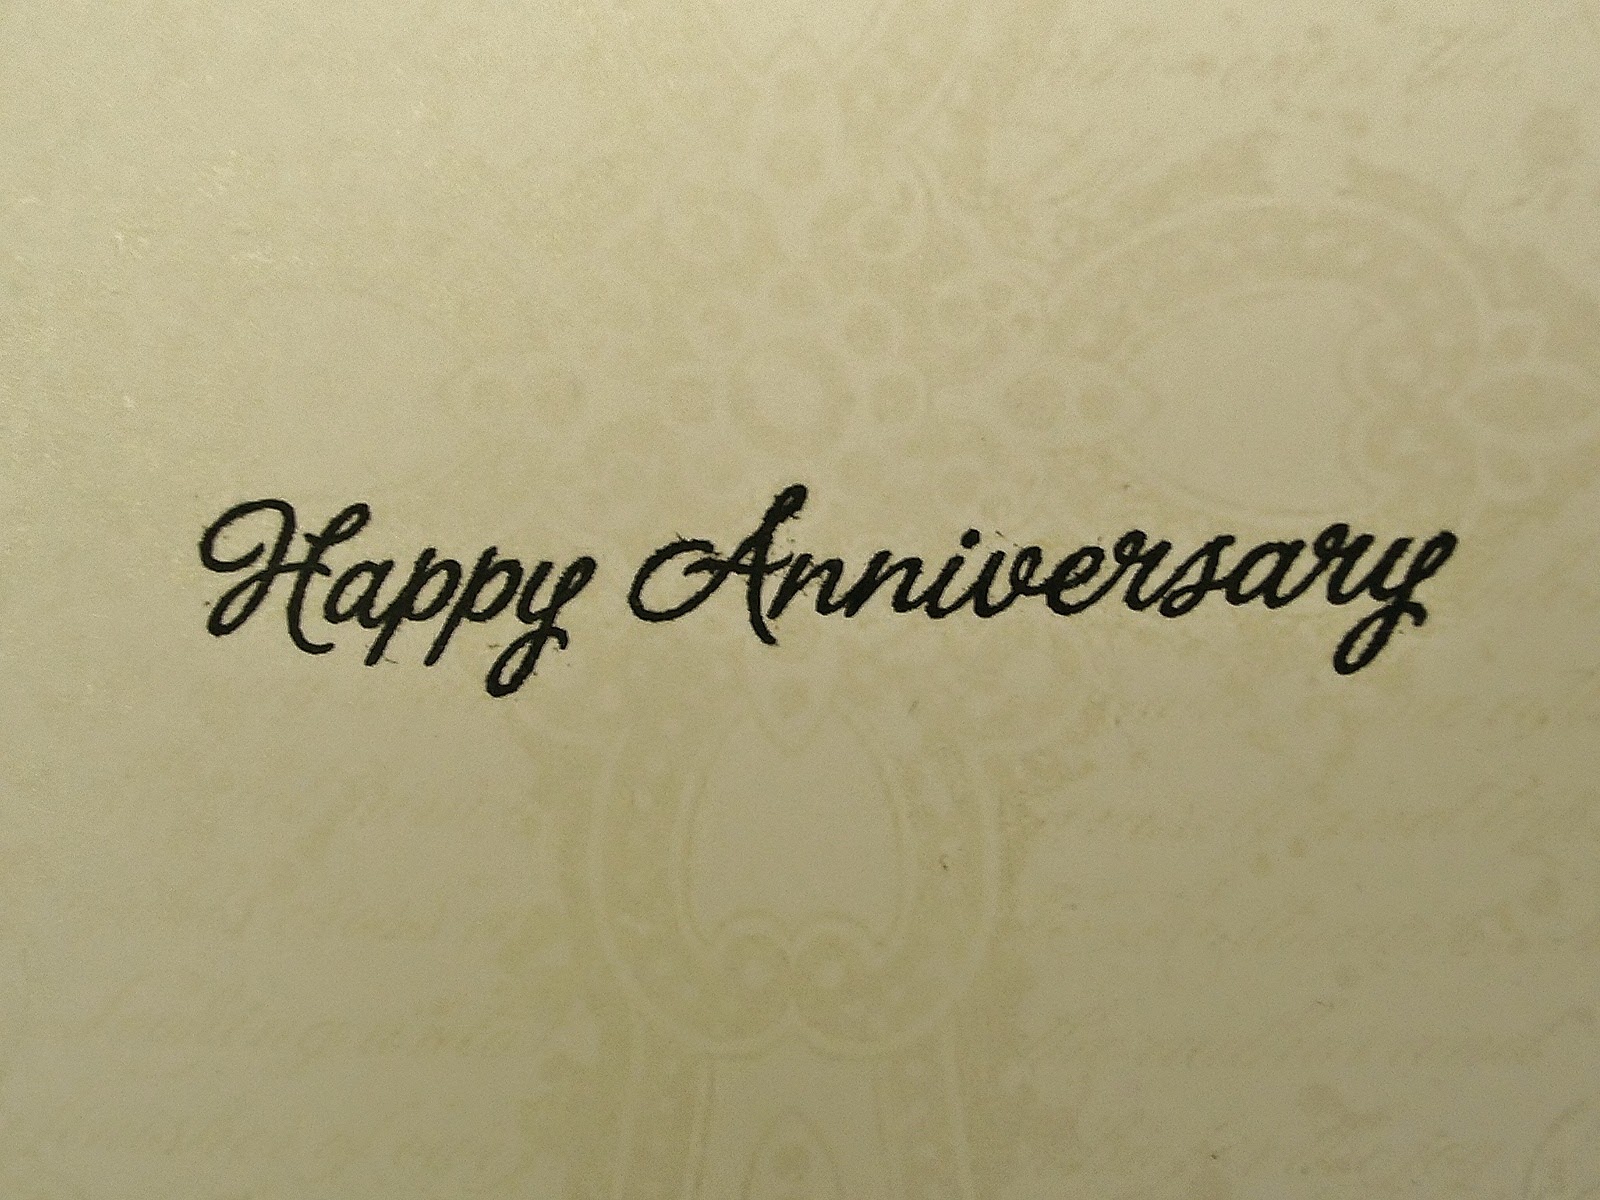
I needed to keep the inside very simple to accommodate lots of well-wishes and signatures.  I decided to use a large stamp, 'Baroque Cross' from Stampendous inked with VersaMark Dazzle Watermark pad in 'Frost.'  It's another very subtle effect, leaving a light shimmery image on top of which I stamped the 'Happy Anniversary' from Hero Arts.


Just for fun I added  'Uniquely Handmade' (from Stampabilities) to the back using Tim Holtz Distress Ink in 'Antique Linen.'


All I have left to do is make an envelope.  Now you know why I usually create the A2-sized cards - I don't need to make the envelopes!  (tee-hee)


That's it for today, my lovely friends.  Thanks for visiting!

'Til next time.....
BIG Hugs!!!
CHRISTINE

Wednesday, April 23, 2014

Love for MOM

Hi everyone!  Sorry I've been missing for a little while; life just got in the way a bit.  BUT now I'm back with a lovely little Mother's Day card for this weeks' Card A Day Blog theme.  I had some great fun with Washi Tape on this one, as well as a leftover flower and a butterfly from earlier projects.

I started by pulling several reds from my washi collection and laid a strip of each on a backing paper.  I cut the bottom into a banner 'v' and mounted it on a layer of white with double-sided tape and then on a layer of red with foam tape.  I then added that piece to the card base with the top edges flush to the top of the base.


I stamped the greeting with black ink on white, and then die cut it for a nice shape.  I used the next size nesting die to cut a backing layer in red.  I affixed these pieces together, and then used foam tape for layered mounting.  I colored the flower pieces and lightly colored the butterfly both with Pan Pastels, and gave them some rhinestones for a bit of sparkle.


I wanted to bring just a touch of red to the inside of the card, so I applied a narrow strip to the inside before stamping the sentiment, also in black.  Sorry it looks a little off-kilter; card wouldn't lay flat for the photo.


And that's it; really quite simple.


I hope you've enjoyed my card today; always love a comment!  And don't forget our giveaway at Beccy's Place.  I'll be back tomorrow with another card I created using Beccy's designs -- commenting there, as long as you're a follower of my blog, gives you another chance to win.

Thanks for visiting.  I hope the rest of your day is simply fabulous!!!

'Til next time.....
BIG Hugs!!!
CHRISTINE


Thursday, April 3, 2014

In Sympathy

Welcome, friends.  We have a week of those sometimes difficult-to-make Sympathy cards as our inspiration for you at the Card A Day Blog.  I have been enjoying using lots of my dies for my cards recently, and my card today is another example of that.

I used four different die sets, beginning with the medallion.  My initial thought was to have a sympathy sentiment in the center, but that changed when I came across my Inkadinkado inchie set of cross stamps.  I used a scrap of slightly shimmery gold paper to cut the medallion, then stamped the cross on a bit of 'Very Vanilla' Stampin' Up card and heat embossed it with Stammpendous 'Detail Gold' powder.

 
I used the same off-white paper as the circle to die cut the background and the flower.  I used Ranger Distress 'Antique Linen' ink to frame the cross, as well as to edge the flower.  I then shaped the flower petals with a stylus and assembled the pieces using a gold glitter brad from American Crafts.
 
 
Next I die cut the leaves from some coordinating scraps of green papers and formed them with the stylus as well.


When I was ready for assembly, I ran the background through my Xyron sticker maker and affixed it to the green card which was cut at 5 1/2" x 4 1/4."  I used Matte Accents to attach the leaves and a Glue Dot to add the flower.  I layered the circle and the medallion both with foam tape before affixing them to complete the card.


I think this is a very elegant and tasteful card to present to a bereaved family member or friend.  I hope it has been a good inspiration for you, and I thank you for your visit today.
 
I'll be back in a couple of days with my first card for my Guest Designer spot at Beccy's Place.  We just might have some goodies in store so I do hope you'll come back and take a peek.
 
'Til next time.....
 
BIG Hugs!!!
CHRISTINE

Wednesday, March 26, 2014

He Is Risen

It's less than one month until Easter, and  the Card A Day Blog is celebrating with a week of Easter card inspiration.  My contribution to this theme is a clean and simple card with some lacy elegance.  I made this card using a few dies, some larger scraps and a few gems.  I didn't quite get away with no stamping, but I kept it to a bare minimum.

The card started with a fun fold that I've used once before, but this time I used it in reverse.  You can see the other example here.  So, the first step was cutting and folding the base.  Here are two photos of the card from the back where you can clearly see the cuts.


Next, I did the die cuts using  some scraps of gold card stock.  I just love the lace cross and trim.  I used my Xyron sticker makers to affix adhesive to the lacy pieces.  Such a quick and easy way to get those pieces adhered to the base.


I used a pretty gold embossing powder for the sentiment, and then cut that piece with a lacy scallops die before affixing it to the gold lace-edged die cut label using foam tape.  I added foam tape to just half of the gold label, and adhered it to the left front of the card base.


Once I had everything assembled, the card didn't look quite finished.  I took care of that by adding some gems to the cross and label.  That did it!  Quick, yet classy, and a good style for doing multiples.  Also, it fits into a standard A2 envelope.


I hope you have a wonderful day, and thanks so very much for spending part of it with me!

BIG Hugs!!!
CHRISTINE

Thursday, March 13, 2014

A Lovely Day

I am SO HAPPY the spring weather is finally pushing its way in.  And it's just in time for our week of Spring inspiration at the Card A Day Blog.  Spring definitely puts me in mind of lots of greenery and pretty flowers all in bloom.  I guess I'm also feeling a bit of Spring Fever; I'm having all kinds of trouble focusing on writing this for you.  On that note, I will try to keep it short and sweet.

Since  I wanted to color some flowers for this card, I went to my collection of Just Rite Stamps where I knew I had some lovely flowers.  While searching for the flowers I came across some doily stamps that I decided would make a nice frame for the flowers.


Then I found 'just the rite' sentiment in yet another of the sets.

 
The creators of the Just Rite stamps were kind enough to remind me on their packaging that their sets were designed to coordinate with Spellbinders die sets.  Luckily, I had the appropriate sets, as well as a nice edge die and a ribbon tag for my sentiment.


Once I had the coloring done and the elements ready, I needed to find my green papers.  That turned out to be a quick check through a few of my mat stacks.  I thought I was finished, but I decided my card needed just a bit more bling; the shimmer on the ribbon didn't quite do it for me.


So, a few jewels along the bottom and DONE!

 
I hope I kept it short and sweet enough for you.  ; )  Here are the facts as I know them:
     Stamps:  Just Rite sets 'My Garden' 'Grandma's Doilies' and 'Be Happy'
     Paper:  DCWV 'Lemon Flower' matstacks
     Ribbon:  Really Reasonable Ribbon
     Pencils:  Tombow 'Irojiten'
     Dies:  Spellbinders 'Circles' 'Small Scalloped Circles' 'Ribbon Tags Trio Two' and 'Lattice
                Borderabilities Petites'
     Jewels:  Creative Memories 'Enchanted' Epoxy Stickers

Thanks so very much for visiting today, and 'til next time.....
Big HUGS!!!
CHRISTINE

Wednesday, January 29, 2014

Letterpress Style Thank You

I don't know about anyone else, but I am so ready for Spring.  This Winter has brought much colder weather than I have seen a quite some time, and I find that I am able to tolerate it much less.  We have been blessed with a mere fraction of the snow that some areas have had; and that's a very good thing as far as I am concerned.  With any blessings should come thanks, and "Thank You" just happens to be our theme at the Card A Day Blog this week.

I was reminded, by something in my wanderings around the web, that I haven't used my Spellbinders' Impressabilities in a long time. So I decided to get them out and use one for today's card.  If you're not familiar with Impressibilities, they are very thin metal templates that can be used in many ways; such as embossing/debossing, as a stencil, cut apart and the pieces used as embellishments.  I have used mine in a 'letterpress' style.  Letterpress is a style of printing where the type is set, ink is applied and the paper is pressed into the type to pick up the ink.  This method also leaves an impression in the paper.  This is, essentially, just what I did with my template.


I used a splatter mat to keep from getting ink on my table and applied ink directly from my stamp pad to the template.  I carefully placed my piece of cardstock on the inked template and put it in the proper sandwich to run through my Cuttlebug.  The result is a lightly embossed inked impression.   I inked the edges of this piece just a bit to help it stand out against the card base.


Once I had my embossed layer prepared, I wrapped three strips of 3/8" satin ribbon around the center.  I then die cut two layers for my sentiment.  These pieces were also inked just a bit on the edges.  I stamped my sentiment, and then layered all three pieces using foam tape.


This was a slightly messy project, but really quite easy to accomplish and is no problem at all to clean up.  I hope you'll decide to try this type of design style.  Even if you don't have the Impressabilities, you can use the same method with an embossing folder, and a deeper impression can be obtained.  You can see an example of that here.


Supplies:
     Paper:  Recollections
     Dies:  Spellbinders "Timeless Rectangle"
     Impressabilities:  Spellbinders "Flourish"
     Inks:  Tim Holtz Distress "Dusty Concord" by Ranger and Stampin' Up "Wisteria Wonder"
     Stamp:  Stampin' Up "Blooming with Kindness"
     Ribbons:  Ellen Hutson

'Til next time.....

Big HUGS!!!
CHRISTINE

Wednesday, January 22, 2014

Don't BUG Me!

It is SO still the season for catching all those nasty bugs that keep floating around.  I hope you've been able to avoid being in that situation.  On that note we, at the Card A Day Blog, have some Get Well inspirations to share.  I received some really cute supplies from my dear sister for Christmas, and decided to use some of them for today's card.

My card was a fairly quick one to make once I decided just what I wanted to do.  First I'll show you the main supplies I used.


The two stamp and die sets were part of my Christmas gift.  Now, here's my card:


When I was getting out my supplies I thought I would stamp the 'bug' outline and color it, but there were a few dp scraps sitting next to my new sets and one just caught my eye.  So I lined up the outline stamp where I wanted it on the scrap, and used the die to cut it out.

In the same stack of scraps I found a piece of handmade paper that was perfect for cutting out the clouds.  The handmade paper gave the clouds some nice texture.


I'm not sure you can see the texture in the photos, but it shows up nicely in person.

Next, I cut a scrap of blue for some sky, and I tore a piece of kraft card to use for the ground.  I used two brown-toned inks to color the edges a bit without making the ground too busy-looking.


After stamping the sentiment, I laid the 'sky' down with my ATG, and used foam tape to affix the ground pieces and the car.  I used a double layer of the foam tape to lift the lower ground piece above the car.


My card base, which is sized at 4 1/4" x 5 1/2" to fit a standard A2 envelope, is a dark navy blue, so I added a white insert for the message and signature.

The pictures don't really show it off very well, but this card is very cute in person and will certainly help brighten the day for someone who isn't feeling quite up to par.

Details:
     Stamp/Die Sets:  taylored expressions "Wheely Great" set and hampton art "Welcome Home" set by doodlebug design inc. and Sizzix.
     Inks:  VersaMagic "Ocean Depth" Chalk Ink and Memento "Desert Sand" and "Rich Cocoa."
     Cardstock:  Gina K Designs "In the Navy" and Neenah "Kraft."

Thanks, as always, for your visit.  Please know that I truly appreciate the time you take to spend with me.  'Til next time.....

Big HUGS!!!!!
CHRISTINE

Wednesday, January 15, 2014

Who Loves You

Happy Wednesday, everyone!!  It's a beautifully bright sunny day where I am.  I hope your day is just as lovely.  And speaking of things 'love'ly, I have another Card A Day Blog Valentine inspiration for you.  Just as in my previous Valentine post, this card is definitely not your traditional "Cupid's Holiday" offering.  I do hope you like it, and it inspires you to go out of the usual Valentine zone and try something different for your loved one this year.  I think my card is ideal for one of the male valentines in your life.

This card came about because I was being so indecisive about which card design I wanted to use; I had three different ideas in mind.  So, I decided to pull out some of my bits and pieces of items left over from previous card-making sessions.  We're not talking about just scraps of paper, but you'll see.  I ended up with a totally different design from what I had expected.

In one of my envelopes of previously made, but unused, ephemera I found a large die cut label perfect for a background.  I also found several punched hearts, including a sweet sparkly one.  Another package search revealed a leafy branch and a cuter than cute die cut owl.  With those few pieces, all I needed were a sentiment and a card base.  Well, I found the card base in a stack of cut card stock, and I decided to create my own sentiment.

Okay, okay, enough blather.  Here's my card:

 
I first inked the background label to give the edges more definition so it wouldn't just fade into the kraft card base.  It seemed an ideal backing for an owl on a tree branch.  I mounted the background using foam tape.
 

I next took the leafy branch, which had originally been cut from white paper and colored with markers, and gave the leaves some dimension using a stylus and mouse pad.  I attached the branch with Scotch Quick-Drying Tacky Glue.
 
I then used the foam tape to affix the owl perched on his larger branch so it would look like the smaller branch was growing out of the larger one.
 
Next, I started working on my sentiment.
 

I decided what my owl would say, typed it into a word-processing document and printed it with brown ink onto Stampin' Up 'Very Vanilla' cardstock.  It had taken me awhile to decide on the shape, but I thought it would be cute as a ribbon flying in a breeze.  I tried it out first by writing it on scrap paper and hand cutting to determine whether I would like it and what the sizing should be.  After applying a bit of ink on the edges, I used the foam tape to apply the sentiment piece.
 
All I had left to do was apply the sparkly heart to the owl's chest.  Once the inside of the card is finished, it will, of course, say, "Your Valentine, That's Who."
 
 
I just adore this sweet little card.  I think my hubby will like it, too.  It was such fun putting this card together!  I hope you had fun reading about it.
 
Thanks so much for visiting.  'Til next time.....
 
Big HUGS!
CHRISTINE

Friday, January 10, 2014

ALWAYS.....

.....in my heart.  That is how I feel about you, my dear readers.  Welcome back!  This is my first post for 2014 as well as my first post of the year for the Card A Day Blog.  And we're kicking off the CADB year with Valentine's Day.  My inspiration today actually comes from a guest designer, who wishes to remain nameless, but I think most of you can guess who I'm talking about from previous guest appearances.  This isn't your typical splashy red Valentine, but if you look closely you will find a tiny red heart peaking out.

This card is very cute, but it's also easy to make, especially if you like to color, as the featured image was colored with copics.


This little girl and her sentiment are from the My Favorite Things "Pure Innocence" collection.  If you're not familiar with this line you should definitely take a look; they are so adorable.  Two scraps of design paper were used; one for the sentiment and one to create a colorful off set border.


A white mat was embossed, and a piece of twine wrapped and tied on before mounting to the white A2 sized card base.


I really love this sweet card, and thank my 'guest designer' for her contribution.

Thanks so very much for your visit today.  I hope to see you again soon -- and often!!

'Til next time.....

Big HUGS!!
CHRISTINE


Thursday, December 12, 2013

A Winter's Night

As we speed through the remaining days until Christmas I bring you my final card of 2013 for the Card A Day Blog.  Our last theme of the year is "Snow" so I have made a quick, but very striking, card for you.  It has been very cold and icy in our area, so I was inspired to make a card which depicts that feeling. 

I started with a 4" x 5 1/4" piece of 'In the Navy' cardstock from Gina K Designs for the look of a night-time background.

I used two dies to cut the pieces for my scene from a scrap of shimmery off-white card, and used the same scrap to cut a piece which I ran through my curvy crimper for the snowy groundcover.


The die cut border and the snow were affixed with foam tape and I used tacky glue to attach the tree.  I left many of the branches and snowflakes free, but tacked some of them down using the same glue.


I affixed the front panel with the foam tape to the A2-sized kraft card base, and then used a glitter pen to add a little bit of sparkle around the edges of the panel as well as some of the snowflakes.  I hope you can see the dimension in this angled photo.  You also get a peek of the inside.


I had trimmed the navy piece for the front panel as well as the cut snowy border since it was longer than I needed, so I used those leftover pieces to bring the design to the inside of the card.


This really was a no fuss, no muss card.  The intricate dies cut beautifully with the cardstock I used.  If using a lighter-weight paper it can be helpful to use a piece of waxed paper between the die and the design paper for easier removal of the cut.

Thanks for stopping by.  I always love reading your comments.

Here are the details:
          Dies:  Memory Box 'Frostyville Border' and Snowflake Tree
          Paper:  Gina K Designs 'In the Navy' and Stampin' Up 'Kraft'
          Pen:  Sakura Gelly Roll 'Clear Star'
          Adhesives:  Scotch 'Quick-Drying Tacky Glue' and ATG

'Til next time.....

Big HUGS!!
CHRISTINE